Thursday, June 14, 2012

Colorado Farm and Art Market Dates-2012 (Corrected)

Another summer has begun and it is time for those farmer's markets. I am doing CFAM again, but this year I will be doing the Wednesday and Saturday markets part-time.

Saturday markets are at the Margarita @ Pine Creek from 9-1. The Wednesday markets are at the Fine Arts Center from 3-7.

I am only doing a few Wednesday markets because school starts in August. The dates are:
  • 6/20
  • 7/4 (I'm not sure if the market will be open because of the holiday)
  • 7/18
  • 8/1
  • 8/15
I will be at every other Saturday market. The (correct) dates are:
  • 6/23
  • 7/7
  • 7/21
  • 8/4
  • 8/18
  • 9/1
  • 9/15
  • 9/29
  • 10/13
I'm looking forward to another great season! I can't wait to see some of you again...

Thursday, June 7, 2012

Gettin' Crafty

I love reading crafty blogs. It gives me all sorts of fun ideas and that I really don't have time to do, but I love anyway. Well, I decided that I should start doing a few of them because I feel like all I do is work. It may be working as a mom, as a soapmaker, or as a teacher, but I work A LOT! So, I am going to start doing some of my ideas.

First, when I was going through boxes, I found this old wall plaque that my mom bought from Home Interiors. Does anyone remember those parties? I think they may have been one of the first home shows and my mom was the Home Interiors QUEEN. Just about every decoration in our house came from one of the parties she hosted. I remember the plaque hanging on the wall for my entire childhood. When mom died, it was packed up and forgotten about. Well, when I found it, it almost went into my declutter pile. However, I decided to save it and see what I could do with it.
I think it is cute, but needed some updating!
 So, I sat and stared at it and left it where I could look at it. I finally decided that the perfect place to hang it would be above the descending stairs as you walk in. We recently painted the downstairs bright white with a blue-gray trim. We are planning on using the blue to paint the entryway and the white for the trim. I wanted a color that would stand out, but fit in. I decided I wanted to use a soft yellow. I also wanted the background and words to contrast, I found a color I love called "oil rubbed bronze." It is nice and dark, but not quite black. What do you think?
Not bad for my first crafty project. It was easy too! It took about one nap time to get it all painted.

Have you done any projects where you redid something simple to make it fit your home?

Wednesday, June 6, 2012

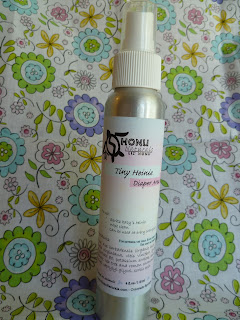
Product Spotlight: Tiny Heinie Diaper Area Wash

I know that it is a mouthful, but is for tiny heinies and it isn't a diaper wash, it is for the diaper area!

The story behind this one is pretty simple. A friend of mine was using cloth diapers and she wanted to use cloth wipes as well. Most places tell you to wet the rag or fill a spray bottle with water and wipe clean. However, it really isn't that simple for everyone. First, water doesn't really clean a poopy area. Second, sometimes that poop is super poop and just will not come off! So, she asked me if I had any ideas and this is what I came up with.

I used a blend of water, aloe, witch hazel, and grapeseed oil to clean, condition, and help that sticky poop slide off. I chose to use grapeseed oil because it is light, high in antioxidants, non-irritating, and great for removing mascara (which means that even super poop shouldn't stand a chance!). Aloe is wonderful and so gentle for skin. It is anti-inflammatory, helps soothe and heal irritations and rashes, and can act as a barrier for the skin. Why wouldn't you use that on a tiny heinie? A little bit of witch hazel was added to help control diaper rashes
(btw, it is also good for razor burn).

Then, I added lavender, tea tree, and roman chamomile essential oils. Lavender and chamomile soothe and calm the skin by reducing irritation and inflammation. Tea tree oil in anti-bacterial and anti-fungal, so it helps keep the area clean and icky free.

I started using this with Hayden and I love it! It is easy to use while holding on to a squirming child and it is gentle and mild for that very tender area.

Find it at my Etsy shop! Visit my website for more great Honu products.

If you have tried this out, please let me know what you thought!

Tuesday, June 5, 2012

Giveaway on Ginger Snap Crafts

I am sponsoring a giveaway on Ginger Snap Crafts today! It is for one Tender Romance gift set which includes an 8oz lotion, 2 oz massage/bath oil, 1 set of fizzing tub treats, 1 bar of soap. Check it out here!

I'm really excited, this is my first time on someone else's blog! I love Ginger's blog, it is full of great craft ideas. I'm all sorts of crazy about her ideas using vinyl! I was told I can't get any until I finish my other projects that I have sitting around, BUT I still have lots of ideas of things I would like to do :)

Check out Ginger Snap Crafts http://www.gingersnapcrafts.com/!

Monday, June 4, 2012

Dead Sea Mud and Peaked Tops

The other day, I made some more of my Dead Sea Mud Soap. This time, I decided not to separate the salt and the mud into different layers, it was all going in the pot together. I also decided that I wanted to add a little lemon essential oil to the blend of peppermint, rosemary, and tea tree.

I chose to add sea salt to the mud bar because sea salt offers some of the same skin care benefits that Dead Sea mud does. It is detoxifying, exfoliating, and good for skin conditions such as eczema, psoriasis, and acne. I do not add Dead Sea salt, just regular sea salt because the extra mineral in the Dead Sea salt makes the soap "sweat." I originally chose peppermint, rosemary, and tea tree essential oils because they are all good for skin; they can help fight acne and dry skin! Plus, they smell so good together. I decided to add a little lemon because it also fights oily skin, but can also increase circulation and exfoliation. It can cause irritation, but I used it at a relatively small percentage.
I looks so fun! The trick is a REALLY thick soap...
I also decided to try my hand at "peaked tops" for soaps. I got the idea from a wonderful soap challenge at Great Cakes Soapworks, I didn't participate because of time constraints, but I loved reading! I watched several videos and read a couple of posts, so I just had to give it a try! I kept it fairly simple; I used a spoon to push the soap into peaks in the center and then I poked, prodded, and pushed until I was happy with it.

I unmolded and tried to cut the soaps today. I thought it was a little hard, but I didn't worry about it. As I started to cut, I noticed the first bar start to crack! DUH! Salt makes the bars a little more brittle, plus it was much harder than normal. So, I popped it in the oven to warm it all back up. They cut better, but the bottom edges did start to crumble a little. I don't think it will be a problem once they are cured and cleaned up though. I also decided that I won't do peaked tops until I get a wire cutter :)
Not a great picture, but I did it with my phone. I love them!

These will be ready around June 29th. I usually let them cure a bit longer, but as hard as these already are, I think that will be long enough. Mark your calendars because these usually go fast!

Saturday, June 2, 2012

Declutter Challenge: Garage Sale!

So, we had our garage sale today. We took everything that we've been thinking about getting rid of, but didn't want to donate it or toss it (or we just hadn't gotten to it) and put it out front. We also started pulling stuff out of the garage, which we've been meaning to clean, and put it out for sale. I'm not even sure where some of the stuff came from!

Now, we didn't really make that much money on our garage sale, but we DID get rid of a lot of stuff. And really, that was what I wanted most. I really do let stuff go cheap at garage sales because I want to get rid of it. I don't want to pack it back up and put it back in that garage! We got rid of a lawn mower that didn't work (I was honest about it), an aquarium full of supplies, 2 boxes of books, several videos, some stuffed animals, and a few other odds and ends.

During the garage sale, we also worked on cleaning out the garage! We went through LOTS of boxes. Our recycle bin is completely full! We moved some books up to the office to sell on Amazon. Some went into a box bound for Goodwill or another garage sale, it depends on which comes first.  Others went into the recycle bin. We collected a few more boxes of stuff for sale or donation, but we haven't decided which yet. I consolidated to bins of clothes; some were seasonal, some I'm working my way back into (don't tell me I'm not supposed to keep those because I can't afford a new wardrobe once I lose weight), and a few were t-shirts that I'm saving for a quilt. There are still more boxes to go through, but I'm not up for some of them just yet because they belonged to my mom. Others, I just ran out of time.

Oh! And on Friday, I loaded up all of the paint that has been in the garage since we moved in because the landlord said they didn't see a reason to remove it and I took it to the hazardous waste place! It really was enough paint cans to fill the back of my car. How ridiculous!

So, that is my major decluttering! I'm only counting the garage sale as two weeks, but the paint counts for next week :) Pretty soon, I may actually be able to use my garage!

Share your decluttering stories! Please, please, please! Have you joined me yet or are you still just thinking about it? Remember, you can start small!

Wednesday, May 30, 2012

Don't Skip Toner

Toning your skin after cleansing is an important step that many tend to skip. It is one of those steps that we are told we should do, but never given a reason for doing it. I have posted recipes for toners (here and here), but I haven't explained why they are important. Many misunderstand the purpose and do not do it correctly or do not use the correct product. So, they do not get the desired effect. However, cleansing, toning, and moisturizing are all important steps to keep your skin glowing and beautiful. 

The purpose of a toner or astringent is to remove all residue from your skin, refine your pores, and prepare your skin for moisturizing. What kind of residue needs to be removed? All kinds! Oily residue, dead skin cells, and even leftover cleanser. All of that should be removed before you moisturize your skin. A good toner should leave your skin feeling soft and fresh, not dry and tight. Remember, skin should be slightly damp when you moisturize. If your toner doesn't leave your skin feeling refreshed before you moisturize, you should look for a different toner.
Photo by: wlcutler Witch hazel is lovely and effective!

Choosing a toner or astringent depends on your skin type. Dry skin does not need the same care that oily skin needs. Try to choose a toner or astringent without alcohol or use in moderation. Overuse can actually cause skin to produce excess sebum to makeup for the drying effect of alcohol. Floral waters, aloe, witch hazel (without added alcohol), and herbal infusions all make great toners or splashes.
Photo by : tjmwasson Aloe is a great ingredient for a toner!
There are different ways to tone your skin after cleansing:
  1. Moisten a cotton ball with your toner and gently sweep over face. This is usually best for normal to oily skin types because it helps wipe away all though residues we talked about. 
  2. Dilute an alcohol based astringent with water and splash on your face several times. After each splash, catch the liquid in a bowl or sink and repeat. You should use a bowl of cold water and just a splash of astringent.
  3.  Dilute your toner in a spray bottle (half toner/half water) and spritz on face. This might work best for normal to dry skin types because it stays on your skin. So, your skin is a little more moist when you apply your moisturizer.
Have you found the perfect toner or are you still searching?