I mentioned yesterday that I was running really low on certain items and I would be having a sale to clear everything out before the end of the year.
well...THE SALE IS ON! I have updated all of the items on sale and marked them 20% off. You don't need a coupon code to enjoy this one! I do have limited inventory for these items and the sale is only for items marked.
Hurry, I have a feeling these won't last long.
All orders placed by Tuesday, December 18th will ship by December 19th. So, barring any natural disasters, your order will get there before Christmas.
Wednesday, December 12, 2012
Tuesday, December 11, 2012
Inventory is LOW!
WOW! I had an awesome Saturday at the CFAM holiday market!
I am almost out of many of my products. I am down to just a few items left! Most of my soaps are sold out, as are many of my lotions and tub treats! It was a crazy day, but I had a blast.
I am going to go through and inventory everything tonight and what I have left is going to be on sale for the next week! It might not happen, but I would love to sell out of everything before Christmas. That would make the year end inventory so much easier!
I will also have to ask for you to be a little patient with me. I am almost completely out of soaps. I will start making more of everything after the holidays, but soaps take a while to get ready. Everything else can be ready quickly, but soaps will take a little bit.
Keep your eyes open and check the website for an upcoming sale on all remaining items! (Yes, that was supposed to sound like a car commercial)
Friday, November 16, 2012
Awesome Day!
Today, I stepped out of my comfort zone and I presented at the Colorado Science Conference! I am great at presenting to my students and pretty good at presenting to my fellow teachers. However, I do not do well in front of complete strangers. In fact, my Public Speaking class was nothing short of torture in college! I did actually get better in grad school and presented well, but I still get nervous.
Well, back in the spring I went to the National Science Teaching Conference. I got the idea that if some of those people could present, I could too! I decided to start with the state conference and I was so excited when they accepted my proposal.
My morning didn't start out great. I woke Hayden up when I was getting ready to leave and he was VERY upset that he wasn't going. Then, I was rear ended in Denver. Luckily, there was no visible damage to my car (I will still take it and get it checked out), but the other guy's was pretty messed up. I arrived at the conference a little late, but was really glad I wasn't presenting first!
I set up for the second session with little butterflies in my tummy. I didn't have any problems with set-up, people actually showed up, and I wasn't actually shaking :) I started and as I went I saw people nodding and taking notes, which is very encouraging. At the end, I had some great questions and was able to give some great feedback. I even had a few people stop by to thank me for my ideas and my help!
That makes me feel so good. I can be reasonably sure that I was not one of the terrible presentations I heard people complaining about. I think I'm going to apply for the National Conference and see if I can make it happen!
Monday, November 12, 2012
New Website Is Up!
I have been tired of my old website for awhile now. A lot of work went into the original website and it was fun to see, but I didn't have the ability to easily edit it. I had to give all the changes to the person that maintained my website (which is a close friend, so it wasn't a problem contacting her), but that put a lot of work on her. Plus, I didn't like the fact that I couldn't change anything, we didn't have access to coupon codes, or a host of other features.
We started searching for templates that would fit what I wanted, be customizable (I don't need to look like everyone else), user friendly for me and relatively inexpensive. There are plenty of templates out there, but that "relatively inexpensive" requirement was hard to fill. We did finally find a company that could give us what we wanted!
Switching to this new company required me to switch web hosting companies, so I decided to wait until my old one was up for renewal. That gave us plenty of time to work on what it should look like, get pictures taken, descriptions written and prices updates. Plus, I still have my full-time job and my little monster to care for. It really did take a long time to get it to look right and not all of the glitches have been worked out, but the new site is up and functional! There are a few more descriptions to be added. A few pictures to be taken (or retaken to show new packaging and designs). A few things that will slowly be fixed as we work on it in between all of the other things that must be done. After my last show in December, I will really be sitting down to look over everything and make sure everything is exactly what I want and if I don't want it, it isn't there. However, for anyone in need of a few Honu products for gifts or to keep, the website has everything that is currently available!
I have to say, it really looks pretty darn awesome too!
Saturday, October 27, 2012
New Soaps Available!
We are in the process of putting up a new website, so I'm not adding the new seasonal soaps I made to the old one. But, I wanted to share them with you and give you the opportunity to get yours since they won't last long. If you are interested in any of these, feel free to send me an email at hmwalls (at) honunaturals (dot) com, or message me on facebook.
Pumpkin soaps, made from locally grown pumpkin!
Christmas Soaps
Coming Soon: Cranberry Fig
All seasonal scents can also be special ordered as fizzy tub treats or wax tarts for candle warmers.
Pumpkin soaps, made from locally grown pumpkin!
 |
| Chocolate Pumpkin soap that smells so good you might just need to lather again. Buy two and store one in the closet until you need it, no need for scented fabric softeners :) |
 | |
| Pumpkin Lager is made with beer and pumpkin (it just seemed appropriate), but it smells delicious. The perfect blend of sweet and spicy and yummy! It even comes with a foamy top, just like your lager! |
 |
| Pumpkin Spice soap is made with cinnamon, ginger, clove, and a touch of orange. |
 |
| Reindeer Poop is a special gift from Rudolph to anyone you know that should be on the naughty list or anyone you know that loves great smelling handcrafted soap :) Reindeer Poop smells better than you'd think, it is a sugary blend of spruce and vanilla. It even comes with a special poem on the back. |
All seasonal scents can also be special ordered as fizzy tub treats or wax tarts for candle warmers.
Thursday, October 11, 2012
In The Mold HP Soap
I have tried hot process soap in the past. While I like that the soap is ready quicker, I haven't been thrilled with the texture of the soap. It always felt a little spongy to me. I have worked really hard to packed the soap down to combat this. The was much mushing of soap, banging of the mold, more mushing, and more banging. But, it just wasn't as smooth and glossy. Although, you can still do very nice swirls...
I read about "In The Mold" hot process and couldn't really try it because the molds I was using were not up to a trip through the oven. I started using a silicone log mold and asked the wonderful BB customer service peeps if it could make it in the oven. They said as long as it was under 200, it would be fine!
So, I made a batch of my Naked Shea soap. Dumped in the mold. Put the mold on a baking sheet. Set my oven for 170. AND in the oven it went. I set the timer for 2 hours, but I ended up checking on it every 15 minutes anyway. After about an hour is had completely gelled (it is a smaller mold) and by an hour and a half, it was starting to bubble. I turned off the oven, left the door closed and pulled the soap out the next morning. It was a little funny looking on top, but it was very solid. I didn't have time to cut it, but I was very concerned. I had seen lots of bubbles and was worried about those staying behind. However, when I cut it that afternoon, it was lovely! No air bubbles at all! Just beautiful, smooth soap that is already hard and completely ready to go. It did feel a little oily on the surface, so I put it on some paper bags to "dry" out.
I have to say that I'm really impressed. I know it won't work for all soaps. 170 is too high for some essential oils and even some fragrance oils, but for unscented soaps or scents with high flash points, this is a great way to get your soaps some quicker.
Last night, I made a batch of Chocolate Pumpkin soap with orange and black swirls. It looks and smells great! I made too much black soap, so the orange is a little hard to see, but that has nothing to do with the oven.
 If you want to try the make hot process soap in the mold, here are my tips:
I read about "In The Mold" hot process and couldn't really try it because the molds I was using were not up to a trip through the oven. I started using a silicone log mold and asked the wonderful BB customer service peeps if it could make it in the oven. They said as long as it was under 200, it would be fine!
So, I made a batch of my Naked Shea soap. Dumped in the mold. Put the mold on a baking sheet. Set my oven for 170. AND in the oven it went. I set the timer for 2 hours, but I ended up checking on it every 15 minutes anyway. After about an hour is had completely gelled (it is a smaller mold) and by an hour and a half, it was starting to bubble. I turned off the oven, left the door closed and pulled the soap out the next morning. It was a little funny looking on top, but it was very solid. I didn't have time to cut it, but I was very concerned. I had seen lots of bubbles and was worried about those staying behind. However, when I cut it that afternoon, it was lovely! No air bubbles at all! Just beautiful, smooth soap that is already hard and completely ready to go. It did feel a little oily on the surface, so I put it on some paper bags to "dry" out.
I have to say that I'm really impressed. I know it won't work for all soaps. 170 is too high for some essential oils and even some fragrance oils, but for unscented soaps or scents with high flash points, this is a great way to get your soaps some quicker.
Last night, I made a batch of Chocolate Pumpkin soap with orange and black swirls. It looks and smells great! I made too much black soap, so the orange is a little hard to see, but that has nothing to do with the oven.

- Double check the flash points for any scents. It should be higher than your oven temp.
- Set your oven between 170-185 and watch your soap the first time. The size of your batch will affect cook time.
- Leave your soap in the oven to cool slowly when cooked.
- Ask your mold maker if it will withstand the oven temps (that would be messy).
- Protect your oven with something under the mold.
- If you try this with a milk or honey soap, come back and tell me how it worked out. I'm nervous about trying it :)
- Remember, one way or another it will be soap, even if it is ugly soap.
Thursday, September 27, 2012
Big Changes
So, some of you may have noticed that I've been very absent lately. While it is true that I have been really busy with school, that really isn't the only reason.
I have also been struggling and not feeling my best lately. I have been fighting off nausea throughout the day. Sometimes it would last for long periods of time and make me want to curl up in the fetal position under my desk. That will get you some funny looks from the students for sure! Other times, it is mild and passes quickly. I've also been battling fatigue. One day, Hayden and I were sitting downstairs watching Elmo. I feel fast asleep within 2 minutes. Luckily, the toddler decided to wake me after Elmo was over and not get into trouble. I have had nights in which I'm in bed by 8:00! While that sounds great, it means that all of the things I need to do for school and Honu are piling up a bit. I wasn't lying when I said I'm constantly behind. I really am because I often don't have the energy to do what I need to; it is all I can do to get under the covers before I fall asleep.
What other problems have I been having? Let's see, my multivitamin makes me sick because it makes me burp icky fishy something. My pants are starting to get too snug. It doesn't matter what I do, they are just getting more and more snug and I don't really want to get a wardrobe. I can't take a long hot soak in the tub. I can't have caffeine. I'm not supposed to be gaining any weight, so I'm supposed to avoid carbs, but eats lots of low-fat protein and veggies. I have a toddler that thinks the best game is to jump on mommy, but that is suddenly more painful than it was. I tried making soap the other night and the scent made me sick so I had to stop (maybe I should make some more ginger soap).
I know some of you have already figured out what all of this means, but for those of you who haven't quite gotten there...I am pregnant. Hayden will be a big brother in April. We are very excited and I'm working on dealing with the side-effects. I'm almost 12 weeks along, so hopefully most of the symptoms will let up through my second trimester. That will get me through my busiest season! Past that, we will have to see what life brings.
Thank you for your patience and support through this. I promise, I'm not neglecting you or my soaps. I'm just making sure I take a little bit more care of us :)
Wednesday, September 5, 2012
Declutter Challenge: Update
I know I haven't posted an actual weekly update in a while, but there is a good reason. It isn't just that I've been busy. Really, we're all busy, there are just times when we happen to be busier than others.
I have been decluttering! I promise. The reason I haven't posted an update does have to do with having little extra time, but it also has to do with the fact that right now everything is just random odds and ends that I'm finding. I have a box sitting the office area (yeah, like that isn't clutter!) and I just dump stuff in it when I decide it should go.
For example, last week I pulled two shirts out of my closet and in they went to the box. I pulled a pair of ripped pants out and put those in the trash. I pulled out a pair of not-so-warm gloves and they went into the box. I have added several other things that I just picked up and moved. The box is almost full, so it will be donated soon.
So, I really haven't had an update to give you because I haven't spent a lot of time on decluttering. BUT, it is still happening. It isn't requiring much thought at all. If I see it and have thought about giving it away, I just pick it up and carry it upstairs to the box. It is almost like putting your toys away when you are done. Just pick it up and put it where it goes :) I have found this to be very effective for those hectic times in your life.
Have you found any easy way to declutter that you'd like to share?
I have been decluttering! I promise. The reason I haven't posted an update does have to do with having little extra time, but it also has to do with the fact that right now everything is just random odds and ends that I'm finding. I have a box sitting the office area (yeah, like that isn't clutter!) and I just dump stuff in it when I decide it should go.
For example, last week I pulled two shirts out of my closet and in they went to the box. I pulled a pair of ripped pants out and put those in the trash. I pulled out a pair of not-so-warm gloves and they went into the box. I have added several other things that I just picked up and moved. The box is almost full, so it will be donated soon.
 |
| I don't have a picture to share, so I'm distracting you with a toddler and a puppy! |
So, I really haven't had an update to give you because I haven't spent a lot of time on decluttering. BUT, it is still happening. It isn't requiring much thought at all. If I see it and have thought about giving it away, I just pick it up and carry it upstairs to the box. It is almost like putting your toys away when you are done. Just pick it up and put it where it goes :) I have found this to be very effective for those hectic times in your life.
Have you found any easy way to declutter that you'd like to share?
Monday, September 3, 2012
School Has Started
If you are a teacher or a parent (or you know a teacher or a parent) then you know how crazy the first of the school year is. I know everyone thinks that teachers work 7:30-3:30 and then take off for lazy afternoons, but that just isn't true. We have everything that we did last year to get our kids into the swing of things to do all over again. Notebooks must be set up, gradebooks must be set up, classrooms must be set up, and we have to set the students up for a successful year! If you have kids, you know how hard it can be to get 2 or 3 organized. Now, imagine doing that for a class of 25!
I feel very fortunate to be teaching at the school I am teaching at, but it is a big change from most other schools (keep in mind, I had only taught high school before this). As a small charter school we spend a lot of time with our students making sure they do all of the things that students are just expected to do on their own at other schools. I actually think it is a good thing. We don't just throw them into middle school and say "good luck!" We spend a lot of extra time showing the 7th graders what to do to be successful. I'm happy to do it, but that means a lot of extra work for me and a lot of time at school after Hayden is asleep.
That also means less time for things like blogging and making soap :( Luckily, the students catch on quick and we are all getting into the swing of our new year, so I'm finding more time for the rest of my life! I have resumed my decluttering. My soap room is clean again. I have even managed to find time to write a blog post. I have some soapy plans for the week. And, I'm not at school when Hayden is asleep.
So, forgive my recent absence. We are rockin' along in our new school year and I will be around more often now!
Monday, August 20, 2012
Babassu Oil
I've been looking into substituting some of the oils I use for other oils that would offer more skin care benefits and enhance the quality of my products. I've also been looking at creating products that contain more tropical ingredients because I want to tie everything into the name of my company.
One of the oils I came across is called babassu oil (Orbignya martiana). It comes from a palm tree in Brazil and can be used in place of palm or coconut oil in cosmetics. I like that it can be used in place of palm oil in soap, but I will admit, I haven't tried that yet. According to what I've found, babassu oil is good for all skin types. It is can be used on dry/damaged, mature, and even oily skin! It is so versatile that people are using it in all of their products.
I decided to try it in a lip balm. I substituted the hydrogenated soybean oil for babassu oil and I LOVE the feel of the lip balm. Soybean oil makes a good lip balm, but I have found that many of my customers were questioning whether it was non-GMO soybean (I was assured by the supplier that it was). Soybean is a good oil for normal skin, but doesn't offer that many extra skin care benefits. It really is a good, skin-softening oil, but I want to find some that are better.
The lip balm with the babassu oil has the same consistency, which I really like. It goes on just as smooth and stays on for a long time. However, my lips really do feel softer when I'm using that one! I use several different ones throughout the day, so I notice the slight difference between the new formula and the old.
The only lip balms currently made with babassu oil are my Orange Cream lip balms, but as I make new batches of the others, I will be substituting babassu oil for the soybean oil!
I can't wait to see how it feels in lotion!
Sunday, August 12, 2012
Whirlwind Week
You may have noticed that I have not posted anything all week. I didn't even get my Declutter Challenge done last week! I don't think I'm going to get this week's done either :(
Last week was pretty packed.
Wednesday was my normal market day from 3-7 and I'm usually wiped out afterwards anyway. But, I also received a call letting me know that my 97 year old great-grandmother had passed away. It was hard and very sad, but she was 97. She outlived my grandmother by 30 years, her husband by 20 years, my mother by 15 years, another daughter by a year, and several other children and grandchildren by many, many years. She is at peace.
Thursday, we had a going away party for the middle school aide. She found a job teaching math and science. We'll miss her, but I'm really happy for her too.
Friday was date night and it was a much needed time.
Saturday was my market from 9-1. When I got home, I took a short nap and then packed so we could head to Lubbock for my grandmother's funeral. We got to Lubbock around 3 on Sunday morning. I usually do my decluttering on Saturday or Sunday, so it didn't happen last week.
Sunday we spent with my dad and stepmom and they got lots of Hayden time.
Monday was my grandmother's funeral in Muleshoe, TX. We had to leave around 11 to get there for lunch before the services. Services ended around 4 and then we stayed to visit. We left Muleshoe around 6. We got to Colorado Springs around 2 Tuesday morning.
Tuesday was my first day back for teacher inservice, for which I was an hour late because Hayden and I fell back to sleep. I went to bed around 7 Tuesday night. I was a tired puppy.
Wednesday was the first chance I got to get on my computer, so I did a few things, but my brain was still wiped out.
Thursday was more of the same at school. BUT, my turtle tank was stinky! So, I spent some time cleaning it. We went back up to school Thursday night to clean out the filter and the tank because Open House was Friday and I didn't want parents coming in to a stinky room. We got everything cleaned (I bought a nice new vacuum for the gravel) and the filter hooked back up. We plugged it in and it chugged for a few minutes and died. It was old and turtles are hard on filters, but did it have to die AFTER we cleaned it?
Friday was a long day because of Open House. I enjoy meeting my new students, but it makes for a long day. Then, some of us went out afterwards :)
Saturday was a busy morning filled with getting new school supplies, our awesome board gave us gift cards to help us out, and a few new clothes. Yesterday afternoon, we went to the zoo because I needed a break. I was productive last night...I balanced the checkbook and paid bills. I hear they like it when you do that :) So, no decluttering.
Today, we hiked Seven Bridges, which was really pretty and Hayden had fun in the water at the top. But, we all needed a nap when we got home. This afternoon, I went to school because I was nowhere near ready for the first day of school, but now I am. I got home just in time for dinner and then I played with a toddler. So, I didn't declutter today either, but I made my little guy giggle right up until bedtime, so I'm okay with that.
The first couple of weeks of school are usually the craziest, so please bear with me. I may be absent more than usual.
Tuesday, July 31, 2012
Declutter Challenge: Week 29
I recently made a new jewelry holder based on several I found online, but I'm not sharing that just yet because I'm going to share its transformation later. I decided to replace my old and boring jewelry cabinet with something updated and fun. As I pulled my jewelry, I also decided that I should go through it and get rid of what I don't wear anymore.
I got rid of anything that I hadn't worn in the last year. That really took care of a lot of my jewelry. I got rid of earrings that I've had since high school, but had been saving because they were sentimental. I got rid of a cheap ring I bought in Australia so many years ago, it was cute, but I remember the trip fine without the ring. It felt good to go through and declutter my jewelry collection. I donated it and there were some pretty pieces in there, so maybe someone else will find something they love and enjoy it. I enjoy that my new jewelry holder is starting off just a little neater!
Why did you get rid of this week?
 | |
| See...old and boring |
 |
| Bye bye! |
Monday, July 30, 2012
Scent of Serenity
I recently hit upon a lavender vanilla blend that I just adore. It was hard to get them to blend just right.
At first, my lavender was overpowering or my vanilla was too sweet. I just couldn't get that delicious blend of herbal, yet sweet that I was looking for. I was using Hungarian lavender and Bramble Berry's vanilla select. I love the vanilla select because it is deeper and richer than most vanilla. But, I still couldn't get it right.
I ended up using 3 different vanillas, the barest hint of a sweeter sandalwood fo, and a fair amount of lavender. And I must say that I'm quite happy with the results!
First, I called it Lavender Vanilla Bliss. It really is a blissful scent :) However, that seemed like a very long name and I'm all about simplicity. So, I decided to change the name to Serenity. I thought it was pretty appropriate because it smells wonderful!

I currently have used Serenity to make lotion, soap (bar and liquid), and fizzing tub treats and I am truly loving the scent! There is just something about lavender and vanilla that makes everything better.
What is your favorite scent to blend with lavender?
Sunday, July 29, 2012
DIY Carrot Mask
Carrots are delicious and great for you! They are high in beta-carotene (vitamin A), they also contain vitamin C and potassium. When I was younger, my doctor always told me to eat lots of carrots because they were good for my eyes. He actually meant eye health, not eyesight; I was not happy with my doctor when I had to start wearing glasses. I still ate my carrots though.
Consuming carrots or fresh carrot juice is good for your skin. It helps to keep your skin moisturized really deep down, which keeps your outer skin looking fresher and fuller. Using carrots on your face is good for your skin too. Vitamin A is a great antioxidant, which means it destroys those pesky free radicals that cause wrinkles (and crinkles), eczema (some forms), and dermatitis. It also helps to heal sun damage and even skin tone. Carrot juice is also good for blemishes and scars! The list goes on, but I really wanted to share a fun mask with you, not all the benefits of carrots.
Ingredients:
Don't not use if you are allergic to any of the ingredients.
Give it a try and let me know what you think!
Consuming carrots or fresh carrot juice is good for your skin. It helps to keep your skin moisturized really deep down, which keeps your outer skin looking fresher and fuller. Using carrots on your face is good for your skin too. Vitamin A is a great antioxidant, which means it destroys those pesky free radicals that cause wrinkles (and crinkles), eczema (some forms), and dermatitis. It also helps to heal sun damage and even skin tone. Carrot juice is also good for blemishes and scars! The list goes on, but I really wanted to share a fun mask with you, not all the benefits of carrots.
 |
| Photo by: John Loo |
Ingredients:
- 1 tbsp pureed carrots-you can lightly steam and puree your own or use a jar of baby food (carrots and water only!)
- 1 tbsp yogurt
- Optional ingredients: 1/2 tbsp finely ground oatmeal or kaolin clay
- Mix all your ingredients together. You can adjust the amounts to achieve a consistency that you like. If you are omitting the oatmeal/clay the mask will be a little runny.
- Spread evenly over clean skin. Let sit for 15-20 minutes.
- Rinse well with warm water. You can wash again or just rinse really well. Follow with your favorite toner and moisturizer.
Don't not use if you are allergic to any of the ingredients.
Give it a try and let me know what you think!
Thursday, July 26, 2012
Tub Treats vs. Bath Bombs
The other day someone suggested I start making bath bombs. I replied that I don't make bath bombs, but I do make fizzing tub treats. They replied that I should still try to make bath bombs. It occurred to me that they probably don't know what fizzing tub treats are!
Fizzing tub treats are similar to bath bombs. They are made with similar ingredients that will soften skin while you soak. They both fizz when dropped in your bath water. Both can be scented to give you an aromatic experience in the tub.
That's great, but what is the difference? Bath bombs are usually held together by spritzing the powders with witch hazel and then letting them dry, some crafters do add butters or oils for added skincare benefits. Fizzing tub treats are held together using butters and oils that harden. Bath bombs are made by packing the moist powders in a mold and then removing. My tub treats are packed in a 6 cavity mold and left there, the keeps all 6 tub treats together until you are ready to use. Bath bombs are often sold individually and generally the entire thing is used at the same time (some can be carefully broken apart for multiple uses). Tub treats are packaged in sets of six small cubes, so you can easily decide how many to use in a bath. Plus, the tub treats are easy to store because they are conveniently packaged in a clamshell container with a lid. Like bath bombs they should be stored in a cool, dry location like a linen closet; the bathroom can be too moist and cause your tub treats or bath bombs to develop fizzing warts.
What do you like to add to your bath?
Fizzing tub treats are similar to bath bombs. They are made with similar ingredients that will soften skin while you soak. They both fizz when dropped in your bath water. Both can be scented to give you an aromatic experience in the tub.
 |
| Fizzing tub treats are conveniently packaged. You get 6 individual cubes, so you can chose what to add to your bath! |
What do you like to add to your bath?
Wednesday, July 25, 2012
Toddler Play Room
In May, I posted about our new kid-friendly downstairs area. We cleaned, painted, rearranged, and got rid of a lot of stuff (read more here). Hayden loves his large play area and I love that there really isn't much for him to hurt himself on. He doesn't climb on the shelves because he has a blanket box and table to climb on. He can't get into anything he shouldn't except dvd's and I can deal with that. What I didn't like was how big and empty the walls were!
Toddlers need a stimulating environment and there is just something about big white walls that is un-stimulating. We were trying to decide what to do and I found the perfect solution at Joann's when I was perusing the education section (hey, I'm a teacher, I can't help it). For $10, I got a punch-out set for colors and shapes. That's right, $10 and it pretty much covers up both empty walls.

 I could probably fit more, but everything had to be high enough to be out of reach. Hayden loved helping me put everything up and he really does enjoying going through the colors and shapes. Currently, everything is yellow, but he'll get it. Of all the shapes, octagon is the one he knows, but I think he just likes saying it :)
I will probably do letters and numbers, but for those, I want him to help paint hangings. So, that is a bit further down the road.
What did you put up for your kids to add an educational element to their room?
Toddlers need a stimulating environment and there is just something about big white walls that is un-stimulating. We were trying to decide what to do and I found the perfect solution at Joann's when I was perusing the education section (hey, I'm a teacher, I can't help it). For $10, I got a punch-out set for colors and shapes. That's right, $10 and it pretty much covers up both empty walls.


I will probably do letters and numbers, but for those, I want him to help paint hangings. So, that is a bit further down the road.
What did you put up for your kids to add an educational element to their room?
Monday, July 23, 2012
Declutter Challenge: Week 28
My poor dog is getting old. She is a border collie mix that is 9 1/2 years old! Her eyes are getting cloudy and her anxiety is getting worse. She has had several accidents on her bed in response to storms, screaming baby, and even because it was time for her to go in her kennel. The poor bed smells terrible. We have washed it, hosed it down, and even tried deodorizer. Nothing has worked. Plus, she never really uses the bed because she prefers to sleep in the hall outside our bedrooms. So, I got rid of the bed! It felt bad throwing it away because it was still in good shape, but the smell was bad, she didn't use it, and the toddler liked jumping on it. So, in the trash it went!
I could have stopped there because that would be my one item for the week, but it gave me another idea! I realized that we have a lot of pillows that we no longer use. We recently bought some new pillows, but didn't throw the old ones out...I know, that was just silly. We have two that are in the camping equipment, so they are always there to go with us. We also have two that we keep for guests that occasionally stay with us. However, we still have a couple of other pillows that hang around the closets and other random places. So, I also walked around and picked up them up and sent them with the dog bed.
I also got an email this morning from Amazon letting me know that another of my books had sold! It took me a while to decide to go ahead and list the books that I have that are more expensive. It took about 2 hours to get them all listed, but it has been worth it. I don't have to do much and the books sell. I can even pay for shipping and print labels online, so I'm not spending a lot of time in line and the post office. I do have to go on and check that they are still active, but it has been pretty easy. So far, I've sold 4 books and that has added up to about $100!
See, three super easy steps and I am getting a lot of things out of my house. The best part is, it hasn't taken me much time. It has been something I can do without taking time away from Hayden or myself.
Friday, July 20, 2012
CFAM 7/21
As a reminder, I will be at The Margarita @ Pine Creek tomorrow for the Colorado Farm and Art Market from 9-1. In case you didn't know, everything at the market is produced or grown by the vendors! That is huge. We are not a resell market, so everything you get is local.
I will have these new items:
This week's special:
Get any three 2oz lotions for just $9.50!
You can mix and match any 3 scents. These are perfect for travel, gifts, or anyone that just can't decide which one to get :)
I can't wait to see you tomorrow!
I will have these new items:
- Detoxifying Mud Masque
- Tropical Enzyme Masque
- Fizzing Tub Treats in Ambrosia and Serenity
- Soap Balls in Celebration
This week's special:
Get any three 2oz lotions for just $9.50!
You can mix and match any 3 scents. These are perfect for travel, gifts, or anyone that just can't decide which one to get :)
I can't wait to see you tomorrow!
Thursday, July 19, 2012
Euphoria Spa Soap
I've read about salt soaps and I've been wanting to make them, but I had several concerns. First, salt bars have to be cut really early or they are to hard/brittle to cut. I don't know how my molds would hold up in an oven and a toddler makes it hard to get back in time to cut soap. But, I found an idea for salt soaps using individual molds! Perfect!
As many soapmakers know, extra minerals in soap will reduce the lather of the soap. People with hard water know this too. Most soapmakers add a little extra coconut oil to compensate, but several were concerned that too much coconut would make the soap drying to your skin. I decided to go with 50% coconut oil, but I've read that others go up to 70%. I then did 30% olive oil for moisturizing and 20% palm, but I don't know that I needed the palm to make them hard because I think the salt does that for you.
I couldn't decide what scent to make these. I wanted it to be uplifting and wonderful to go along with a spa or beach experience. I found a small bottle of an essential oil blend called "euphoria" and I thought that would be perfect. I really liked the smell of the blend when I bought it, but never could find the right soap to use it in! I know, that is just silly, but I'm glad I saved it.
I read several blogs about other's salt soaps and I decided to use a 1:1 salt:oils ratio. I also read that you have to be ready to move once you add the salt, so I had my everything ready to go! I mixed to a very thin trace and added my eo blend and mixed some more. I think the essential oil might have contributed to a little bit of acceleration, but I didn't experiment with it before, so I'm not sure (this is why you should always test first...oops). I added my salt and for some unknown reason, I tried to stick blend it in. I quickly figured out that it wasn't a good idea, so I hand-stirred. I started trying to get it in my individual molds and it was really thick. I meant to smoosh it down before I filled up the molds completely, but I realized I had a problem and panicked. So, I just put more soap on top of the soap in the mold. The result looks like two layers smooshed together.
As you can see, the soap was thick and hard to work with, but I smoothed it out nicely. I used my blunt-edged cutter to shave the tops off before I removed them from the molds. They came out of the molds perfectly! I'm so glad I used a smooth mold because the bars are so smooth and glossy on those sides.
So, why did I panic? I didn't take into account how much salt was being added when I made my recipe! So, I had more soap than would fit in my mold. Of course, I didn't have any other molds lined or available. I usually have several extra molds lined for such an occasion! So, that was oops #2. I found some bar molds to use and the soap went in and came out nicely.
Lessons for next time:
As many soapmakers know, extra minerals in soap will reduce the lather of the soap. People with hard water know this too. Most soapmakers add a little extra coconut oil to compensate, but several were concerned that too much coconut would make the soap drying to your skin. I decided to go with 50% coconut oil, but I've read that others go up to 70%. I then did 30% olive oil for moisturizing and 20% palm, but I don't know that I needed the palm to make them hard because I think the salt does that for you.
I couldn't decide what scent to make these. I wanted it to be uplifting and wonderful to go along with a spa or beach experience. I found a small bottle of an essential oil blend called "euphoria" and I thought that would be perfect. I really liked the smell of the blend when I bought it, but never could find the right soap to use it in! I know, that is just silly, but I'm glad I saved it.
I read several blogs about other's salt soaps and I decided to use a 1:1 salt:oils ratio. I also read that you have to be ready to move once you add the salt, so I had my everything ready to go! I mixed to a very thin trace and added my eo blend and mixed some more. I think the essential oil might have contributed to a little bit of acceleration, but I didn't experiment with it before, so I'm not sure (this is why you should always test first...oops). I added my salt and for some unknown reason, I tried to stick blend it in. I quickly figured out that it wasn't a good idea, so I hand-stirred. I started trying to get it in my individual molds and it was really thick. I meant to smoosh it down before I filled up the molds completely, but I realized I had a problem and panicked. So, I just put more soap on top of the soap in the mold. The result looks like two layers smooshed together.
 |
| Not so smooth because it didn't pour nicely. The other three cavities are filled with soaps that I was testing FOs on. See, I do test! |
As you can see, the soap was thick and hard to work with, but I smoothed it out nicely. I used my blunt-edged cutter to shave the tops off before I removed them from the molds. They came out of the molds perfectly! I'm so glad I used a smooth mold because the bars are so smooth and glossy on those sides.
 |
| I do wish they were more even in the middle, but I'm still in love! |
So, why did I panic? I didn't take into account how much salt was being added when I made my recipe! So, I had more soap than would fit in my mold. Of course, I didn't have any other molds lined or available. I usually have several extra molds lined for such an occasion! So, that was oops #2. I found some bar molds to use and the soap went in and came out nicely.
 |
| Not the molds I would have preferred, but they worked nicely. |
Lessons for next time:
- Use an FO or EO that I've already tested and does not accelerate trace. The soap does a great job of that.
- Resize my recipe to account for the salt.
- Get it into the mold quicker and maybe get a helper to smoosh it into the mold evenly.
- Euphoria smells even better in soap than I expected. Buy more!
Monday, July 16, 2012
Declutter Challenge: Week 27
We've been gathering stuff for another garage sale, so we have a lot of stuff going into the garage. That means that our garage has been a little messy. On Saturday, we decided to clean it up a bit. We pulled a few boxes in from the garage because there is some stuff that we would like to put up online; instead, of putting it in a garage sale. Which means we have a little more clutter in the office now. I just got it cleaned up too! Oh well, we are getting stuff listed and that is just another way to declutter as it sells.
Remember, my declutter challenge is just one item a week to get rid of. It can be small or large, but once you get started, it becomes really easy.
That was not my major declutter though! Saturday, I was putting laundry away and I looked into the shelves in my closet and gasped! It was time to clean out the closet.
I pulled everything off the shelves on the side and up above. I went through all the clothes and cleared out my sweatshirt collection. I put some of the clothes back because I wear them :)
I also found several bags that I cleaned out. One was an old soccer bag that had a tape player (that still works) and a first aid kit. I cleaned out the bag from my triathlon days. I took out the sunscreen, skin glide, and the defogger, but put the wetsuit, goggles, and swim cap back. I also found another bag that was empty that didn't need to be kept, so it went out to the garage.
Now, my closet looks nicer and I am happier with it. How long did all of this take me? I did this while dinner was in the oven and the toddler was distracted with toys in the kitchen. So, this was less than 30 minutes worth of work.
What have you decluttered!
Remember, my declutter challenge is just one item a week to get rid of. It can be small or large, but once you get started, it becomes really easy.
That was not my major declutter though! Saturday, I was putting laundry away and I looked into the shelves in my closet and gasped! It was time to clean out the closet.
 |
| GASP! Ok, the clothes on the bottom shelf I do wear, but some are seasonal and some can't hang. |
I pulled everything off the shelves on the side and up above. I went through all the clothes and cleared out my sweatshirt collection. I put some of the clothes back because I wear them :)
 |
| I did keep a few sweaters, but these can go. |
 |
| Soccer bag from my days as a Filly! |
 |
| Yes, those patches say '86. I've had it a while. |
 |
| I found my old tape player. It was a very good one too! |
What have you decluttered!
Tuesday, July 10, 2012
Declutter Challenge: Week 26
I am halfway through my 52 week challenge! I have to say that it is getting easier and easier to do. Now, if I see something that I've been telling myself I will get rid of when I clean, I don't wait until I clean! I pick it up and get rid of it. Currently, those things are going out to the garage into one of two piles, donate or garage sale. I know you are probably saying that I'm not really getting rid of it. But, I think it counts because I am regularly taking things to be donated. I don't have too many things that just need to go to the trash because I am good about throwing away things that should be tossed. BUT, that brings us to this week's challenge.
I have kept every card and note that I have ever been given since I was born. You think I'm exaggerating, but I'm not. I have all of the notes that my friends and I passed back and forth in middle school. Do you have any idea how many show boxes that is? I decided it was time to clean those out.
I will say that this challenge took longer than some of the others. As I was going through all of the cards, I made sure to read them. It is time to stop keeping them, but I did want to read them. I know I won't remember what they all said, but I read them anyway. I went through my notes first and most of those I did not read, I just made a note of who it was from and smiled fondly at the memories of the people that gave them to me. I did open a few and had to laugh at the things we wrote and to remember who are middle school crushes were. Those went into the recycle bin. I considered shredding them, but I don't think anyone cares who my middle school crush was.
Then, I started going through cards. Some, I did keep. The 2nd birthday card from my Motch was something I wanted to keep. Others, I read and smiles at and put in the "to go" pile. I let go of many things that I've been holding on to and I thing that was good for me. I held on to the last card my mom sent me because I need to, I'm not ready to let that go. I held on to a couple from people that were very close to me. I will say that I shed more than a few tears reading the cards. Sympathy cards from when we lost mom, birthday cards from loved ones that are gone and lost friends, and even a few just because. All in all, it was an emotional cleaning, but it needed to be done and done it is. I won't forget the people that gave me the cards and I won't forget that they care about me and really that is what is most important.
What did you get rid of this week?
Monday, July 9, 2012
Landscape Soap
I saw this idea on the soap challenge at Great Cakes Soapworks blog. I didn't have time to participate because of school and all those pesky things teachers do at the end of the year, but I saved the ideas for later. I loved the idea of a landscape soap and I really wanted to try one.
I decided to make my Twilight Seduction soap a landscape soap. I wanted it to look like twilight over water. So, I studied lots of pictures of twilight, which isn't easy because most of what came up on the first search involved Edward and Bella. Not helpful! But, I finally found some pictures that I loved.
I decided that for my first try, I would use fewer colors than are generally associated with sunsets. I wanted the moon high in the sky, but when I made the batch for my moon, I didn't think about the fact that the sun is still present. Oh well, I'll do that next time. My fragrance is a blend of vanilla and mint. I didn't want the vanilla to discolor the entire soap, so I only used vanilla half of the soap. So, here are the steps I took for my masterpiece.
1. Make soap. This step is critical.
2. Divide soap in half. Scent half that will make up the water with a vanilla blend, add shredded soap to look like reflections, and color with a mix of ultramarine blue, violet, and black oxide (more next time.) Pout into bottom of mold.

 4. Color other portion pink/orange (brighter next time). Spoon over yellow.
 5. Add white thin soap log that you spent a lot of time trying to make into a nice circle. Next time, don't let the embed soap sit so long. It was hard to make round.
 6. Color the last bit of soap blue, violet, and black (darker next time, but not as dark as the water). Cover pink layer and that pesky moon. Don't smooth it out. It looks nice like that.
 7. Wrap up nicely for gel or not as you prefer. Clean up the mess you made.
 8. Pull out of mold and admire. Then cut.
 9. Don't fret about sad looking water layer. The vanilla will make it darker. A lot darker I hope.
 10. Celebrate the discoloring power of vanilla, for once:)
 Notes for next time:
I decided to make my Twilight Seduction soap a landscape soap. I wanted it to look like twilight over water. So, I studied lots of pictures of twilight, which isn't easy because most of what came up on the first search involved Edward and Bella. Not helpful! But, I finally found some pictures that I loved.
I decided that for my first try, I would use fewer colors than are generally associated with sunsets. I wanted the moon high in the sky, but when I made the batch for my moon, I didn't think about the fact that the sun is still present. Oh well, I'll do that next time. My fragrance is a blend of vanilla and mint. I didn't want the vanilla to discolor the entire soap, so I only used vanilla half of the soap. So, here are the steps I took for my masterpiece.
1. Make soap. This step is critical.
2. Divide soap in half. Scent half that will make up the water with a vanilla blend, add shredded soap to look like reflections, and color with a mix of ultramarine blue, violet, and black oxide (more next time.) Pout into bottom of mold.

3. Scent other half of soap with mint eo blend. Divide this into three equalish portions in plastic cups. Color one yellow (use brighter yellow next time). Spoon carefully on top of water. I liked this because it didn't break the other layer and added texture.


- Make the moon round, not oval.
- Make the water darker.
- Add a setting sun.
- Make the colors brighter
- Make less of a mess
Saturday, July 7, 2012
Twilight Seduction Soap
I made this soap last week and I have to say that I was surprised that I only got one comment about sparkling vampires. In truth, the name has nothing to do with vampires. I have three scents that I grouped together because they are deep, rich, and wonderful. The first, I decided to name Moonlight Temptation because one of the fragrances in the blend was called moonlight. I wanted the other two names to tie into the first. Moonlight is a dark chocolate blend and this one is vanilla, I wanted to come up with something to represent light.
I brainstormed dawn, daylight, sunrise, and a few others that didn't catch me. When twilight came to mind, I loved the name Twilight Seduction. I knew that most would assume it had something to do with the movies or books, but it truly doesn't. The three names I decided on are Moonlight Temptation, Twilight Seduction, and Midnight Enchantment. See, nothing to do with vampires.
Website Description:
I brainstormed dawn, daylight, sunrise, and a few others that didn't catch me. When twilight came to mind, I loved the name Twilight Seduction. I knew that most would assume it had something to do with the movies or books, but it truly doesn't. The three names I decided on are Moonlight Temptation, Twilight Seduction, and Midnight Enchantment. See, nothing to do with vampires.
|
| I was going for the moon over the water with the colors of twilight. I even put moonlight shimmers in the water. Not bad for my first try! |
"Twilight
is that moment of time in between two opposing periods of each day. The time
when light still exists in the world as darkness slowly takes over and day
becomes night. To create the scent of twilight, warm vanilla and cool
peppermint are brought together to exist as that moment in which opposing
forces vie for your full attention. In that moment neither exists without the
other and you will be drawn into the seductive embrace of Twilight Seduction.
Shea
and cocoa butter create a creamy bar of soap that will leave behind silky soft
skin and take away that dry, itchy feeling. Let the thick lather surround you
as it washes away your worries and leave you feeling relaxed, refreshed, and
emotionally recharged."
Monday, July 2, 2012
Declutter Challenge: Week 25
I had an idea for this week, but I opened up the hall closet to stuff some towels in and I changed my mind. My before shot magically disappeared, so I can't share the horror with you. Trust me, it was bad. Stuff just got showed in wherever it would fit. There were things buried that we obviously didn't need. Plus, we had so many towels, it was a little ridiculous. There are two adults living here, why do we need so many towels. There are even plenty in the guest bath.
So, I pulled everything out, which my toddler thought was more fun than anything in the world and he helped pull stuff to the floor, all the while saying "helper." I sorted the towels and kept a handful of the nicest to go back in the closet. They all had to fit on one shelf too! I did keep our beach (pool) towels and the best of the animal towels for bathing Kili and fosters. I cleaned out the box of doggie care stuff and got rid of the Bitter Yuck, it was to keep my cat from chewing cords, but she just licked it off and then chewed the cords. I put all of the cleaning stuff, personal care, and such on the same shelf. I have one empty shelf that will be used for sheets, but those were still in the wash yesterday. Extra toilet paper and my foot soaking bowl are at the bottom.
 Apparently, I was slow about putting the towels in too, but we have more than two green towels :) I moved all the extra towels to the guest bathroom for now. My brother is moving from Hawaii, so I'll see if he wants any because I don't think he spent money to ship towels over. After he takes what he wants, I'll keep a few for guests and the rest will be decluttered. I only ended up getting rid of a few towels, washcloths, a neck warmer, and some shower attachment that was here when we moved in. Hayden had so much fun with that! He would talk into one end and put the other to his ear, when I looked at him he said "telephone." AHHHHH! They grow so fast.
 So, it may not seem like much, but remember, the challenge is only one thing a week! Besides, I now have a usable hall closet and a set of towels to give to someone else. SCORE! The first week is always the hardest, but I hope you've joined me by now; if so, I'd love to hear from you.
So, I pulled everything out, which my toddler thought was more fun than anything in the world and he helped pull stuff to the floor, all the while saying "helper." I sorted the towels and kept a handful of the nicest to go back in the closet. They all had to fit on one shelf too! I did keep our beach (pool) towels and the best of the animal towels for bathing Kili and fosters. I cleaned out the box of doggie care stuff and got rid of the Bitter Yuck, it was to keep my cat from chewing cords, but she just licked it off and then chewed the cords. I put all of the cleaning stuff, personal care, and such on the same shelf. I have one empty shelf that will be used for sheets, but those were still in the wash yesterday. Extra toilet paper and my foot soaking bowl are at the bottom.


Friday, June 29, 2012
Berry Smoothie Recipe
As some of you may know, I have been working on changing my lifestyle to be healthier and more fit. If you want to know more, read about it here. One big change for us is eating more veggies. Eating plenty of fruit is not a challenge, but getting a healthy variety of veggies is.
So, when I read about green smoothies, I started experimenting. I loved the saltier versions with more veggies, but we also wanted to see about making some fruity yogurt smoothies too. We tried using water and it all separated and became quite gross to try and drink down. We then tried grape and apple juices, but it was hard to make it taste good with any veggies in it. It we left out the veggies and just used sweet fruit, it tasted fine. However, the point is to get more veggies!
Well, I was at the store the other day and I saw a bottle of V-8 Acai Berry Blend (or something close to that). I came up with an idea :) This idea actually turned out delicious.
Ingredients:
What are your favorite smoothie recipes?
So, when I read about green smoothies, I started experimenting. I loved the saltier versions with more veggies, but we also wanted to see about making some fruity yogurt smoothies too. We tried using water and it all separated and became quite gross to try and drink down. We then tried grape and apple juices, but it was hard to make it taste good with any veggies in it. It we left out the veggies and just used sweet fruit, it tasted fine. However, the point is to get more veggies!
Well, I was at the store the other day and I saw a bottle of V-8 Acai Berry Blend (or something close to that). I came up with an idea :) This idea actually turned out delicious.
Ingredients:
- 8 oz Acai Berry Juice
- 1 cup nonfat greek yogurt
- 2 handfuls of fresh spinach
- 5 strawberries
- 1/2 cup frozen berry blend
- 1/4 cup fresh cherries
- dab of honey
- Throw everything into a blender and blend until smooth-ish.
- Pour into 2 glasses and enjoy!
What are your favorite smoothie recipes?
Thursday, June 28, 2012
Soap Donation
I wanted to let everyone know that I am currently running a little low on soap. I packed up a box yesterday and took it to Care and Share and donated it for the evacuees of the Waldo Canyon Fire. They are still in need of food and other personal care items, if you are able to help out in any way.
I have quite a few batches on the curing racks and I am making more soap, but I am completely out of some soaps. Please be understanding and patient with me while I get my soap store built back up. I promise, I'll be working hard.
Please keep all of the evacuees and their families in your thoughts and prayers.
Tuesday, June 26, 2012
Market Booth
I know I promised you pictures of my new booth, but if you remember, I had my market dates wrong. So, I didn't get pictures that Saturday like I planned. I did have two markets last week, so I got pictures. It is just taking me longer to get them shared.
As you can see, I now have two sets of shelves. I really like the both because it gets everything up off of the table. I still have my little doggie steps that I keep covered with fabric. I still like them, so what get rid of them?
I love the new signs. We had some lumber sitting around in the garage, so we cut it up and painted it. We used a paint marker to write on them and small dowels to make them stand upright. Changing my prices will be more work, but I think it looks nicer than the plastic stand up signs. Plus, these don't blow over as easily.
I'm not completely sold on how I set out my soaps. I want something that bring them up to and keeps them in a line. I just haven't figured out what I want to do yet. If you have a suggestion, let me hear it!
I really think I might buy some more of this fabric and make it into a table runner for the tops of the tables. I played with it some on Saturday and I like it, so I'm going to see if I can find the fabric again.
What do you think? Do you have any suggestions for more improvements?
 |
| Here is the entire booth. Notice the cute little blond kid in the front :) |
 |
| Look at how cute my signs are! Notice the little hand in the corner, he is everywhere :) |
 |
| My other set of shelves that we fashioned from shutter doors. |
 |
| I love this fabric! It looks like little waves. Yes, the hand is back and trying to run off with a package of travel soaps this time. |
What do you think? Do you have any suggestions for more improvements?
Monday, June 25, 2012
Declutter Challenge: Week 24
The decluttering continues! I won't lie to you, it is slowing down a little, but not for the reasons you might think. I have not run out of things to get rid of. I am simply getting to a point where I am putting stuff out in the garage for another garage sale or I am trying to sell it online.
I have several textbooks listed on Amazon. I have a few things on Craigslist and I am getting pictures of things taken to put them on Ebay. So, I am keeping busy and looking for things to declutter, but it is slow going.
Last week, I finally cleaned up the craft area. It really was a mess. It had become an area where we piled things high and ignored them However, I finally got to it. First, I went through my box of cards. I have a habit of saving every card that has ever been given to me, but that means a lot of cards! So, I went through the box and kept the ones that were really important to me. The rest went to be recycled. I remember the people that gave them to me, I don't have to keep the cards. Then, I went through my supply of fabric! I actually got rid of scraps and bits and ugly pieces. That was hard for me to part with, but I did it. I'm not going to use it! So, I have reduced it from a stack, a drawer, and a large tote down to just the tote. If it didn't fit, it didn't stay. I also got all of my projects on my project shelf and if it is a project I lost interest in, I got rid of it. I still need to go through my thread and sewing boxes, but for now everything is on the shelf, in a set of drawers, or otherwise in its place. So, I am happy with it.
I didn't get any pictures because I didn't think about doing a before picture, so my after picture just wouldn't have much of an impact. Oh well.
What have you decluttered recently?
Friday, June 22, 2012
When Good Soaps Go Bad
This week has been filled with making milk and honey soaps. I have been making smaller batches because I was testing out the scents and playing with some new techniques. I decided that I wanted to get all three of my different milk and honey (BooBees) soaps made this week.
My first two batches were wonderful. They did trace pretty quickly (I'm thinking a whisk will be used instead of a stick blender), but other than that, they were lovely. I used concentrated goat milk, so I mixed the water you would use to dilute the milk and mixed in the lye. I stuck that in the fridge. I mixed my oils and beeswax, melted it all together, and stuck it in the fridge. Then, I got everything else together. I poured out my fragrance, my honey, my very cold (not frozen) milk, I lined the mold with bubble wrap, and I put a little pink colorant in a squeeze bottle for some pink swirls. Remember, the BooBees Collection was created to donate money to The Breast Cancer Research Foundation, read about it here. I mixed the lye into my oils, mixed until it was just stable enough and then I put in my fragrance. I separated out just a few spoonfuls into my squeeze bottle and shook it really well. Then, I added my milk and honey to my main batch and mixed.
My first batch of Ambrosia soap was awesome! Read about it here. The soap turned a beautiful honey color and the pink is so light, that I just adore it. My next batch was called Sultry. It is a spicy, tropical scent that I just can't get enough of. I really find myself going in and picking up the soap just to sniff it. This time I put some of the pink on the bottom and sides of the mold. This soap is darker because of the vanilla in the fragrance, but I love it anyway. Again, this batch traced quickly, but I kept it cool and stuck it in the fridge to keep it from overheating. It was ready to be cut sooner than normal, but that was okay because I check my soaps often. I can never just let them sit.
My latest batch was made the same way. It is the same formula with a different scent. Celebration is a blend of fresh strawberries and bubbly champagne that I just adore. I even sprinkled a little glitter on top to go along with the name! Everything went along the same. The temperatures were kept low. I put the entire batch in the fridge to keep it from overheating. When I checked it, it was nice and hard, so I unmolded it. At first glance, it was just perfect! Sparkly, fresh, and golden!
The flip side is another story. Apparently, despite being in the fridge, it overheated anyway. So, that lovely brown goo is caramelized sugar! Good for peanut brittle and caramel; bad for soap :(
 Here are my two positives:
My first two batches were wonderful. They did trace pretty quickly (I'm thinking a whisk will be used instead of a stick blender), but other than that, they were lovely. I used concentrated goat milk, so I mixed the water you would use to dilute the milk and mixed in the lye. I stuck that in the fridge. I mixed my oils and beeswax, melted it all together, and stuck it in the fridge. Then, I got everything else together. I poured out my fragrance, my honey, my very cold (not frozen) milk, I lined the mold with bubble wrap, and I put a little pink colorant in a squeeze bottle for some pink swirls. Remember, the BooBees Collection was created to donate money to The Breast Cancer Research Foundation, read about it here. I mixed the lye into my oils, mixed until it was just stable enough and then I put in my fragrance. I separated out just a few spoonfuls into my squeeze bottle and shook it really well. Then, I added my milk and honey to my main batch and mixed.
 |
| Ambrosia-Love the swirls! |
 |
| Sultry-Needs to be cleaned up, but it is lovely. |
My latest batch was made the same way. It is the same formula with a different scent. Celebration is a blend of fresh strawberries and bubbly champagne that I just adore. I even sprinkled a little glitter on top to go along with the name! Everything went along the same. The temperatures were kept low. I put the entire batch in the fridge to keep it from overheating. When I checked it, it was nice and hard, so I unmolded it. At first glance, it was just perfect! Sparkly, fresh, and golden!
 | |

- Because I did put this in the fridge, it did not get hot enough to volcano and make a big, hot, caustic mess.
- I might be able to rebatch this into something ugly, but usable.
Thursday, June 21, 2012
BooBees Ambrosia Soap
Did you know that in Greek mythology, ambrosia was food or drink for the gods? It provided them with ageless immortality and had to ability to wash away the effects of the years. Many believe that ambrosia was supposed to be a type of honey and the association to ageless immortality is due to honey's ability to heal. Even today, honey is often used by many because of its ability to heal. Read more about the benefits of honey here.
All BooBees products are formulated with goat's milk and honey to give your the richest, creamiest bar of soap possible. Goat's milk, like other milk, contains lactic acid which helps dissolve dead skin cells. It also contains a good amount of cream which is full of fats that help your skin look healthier because it provides extra moisture. In soap, goat's milk creates a creamier, more moisturizing bar of soap. People with dry skin or certain skin conditions, such as eczema, may find that soap formulated with milk can help relieve these conditions and leave their skin nourished.
Honey adds to the humectant qualities of the glycerin already in the soap, but it also acts as an antimicrobial agent on your skin. It will help keep your skin clean and beautiful. Plus, the sugar in the honey will make the soap even more bubbly!
BooBees Ambrosia soap is lightly scented with a warm, rich blend of oatmeal, milk, and honey. It smells amazing when you first take a whiff. Then, when you mix it with water and start sudsing up, you will find that it warms into an experience all its own. It will surround you with layers of bubbles, all bursting with the scent of true ambrosia.
To give them a little extra gorgeous factor and to remind you to feel your boobees regularly, I added a little pink on the top.
All BooBees products are formulated with goat's milk and honey to give your the richest, creamiest bar of soap possible. Goat's milk, like other milk, contains lactic acid which helps dissolve dead skin cells. It also contains a good amount of cream which is full of fats that help your skin look healthier because it provides extra moisture. In soap, goat's milk creates a creamier, more moisturizing bar of soap. People with dry skin or certain skin conditions, such as eczema, may find that soap formulated with milk can help relieve these conditions and leave their skin nourished.
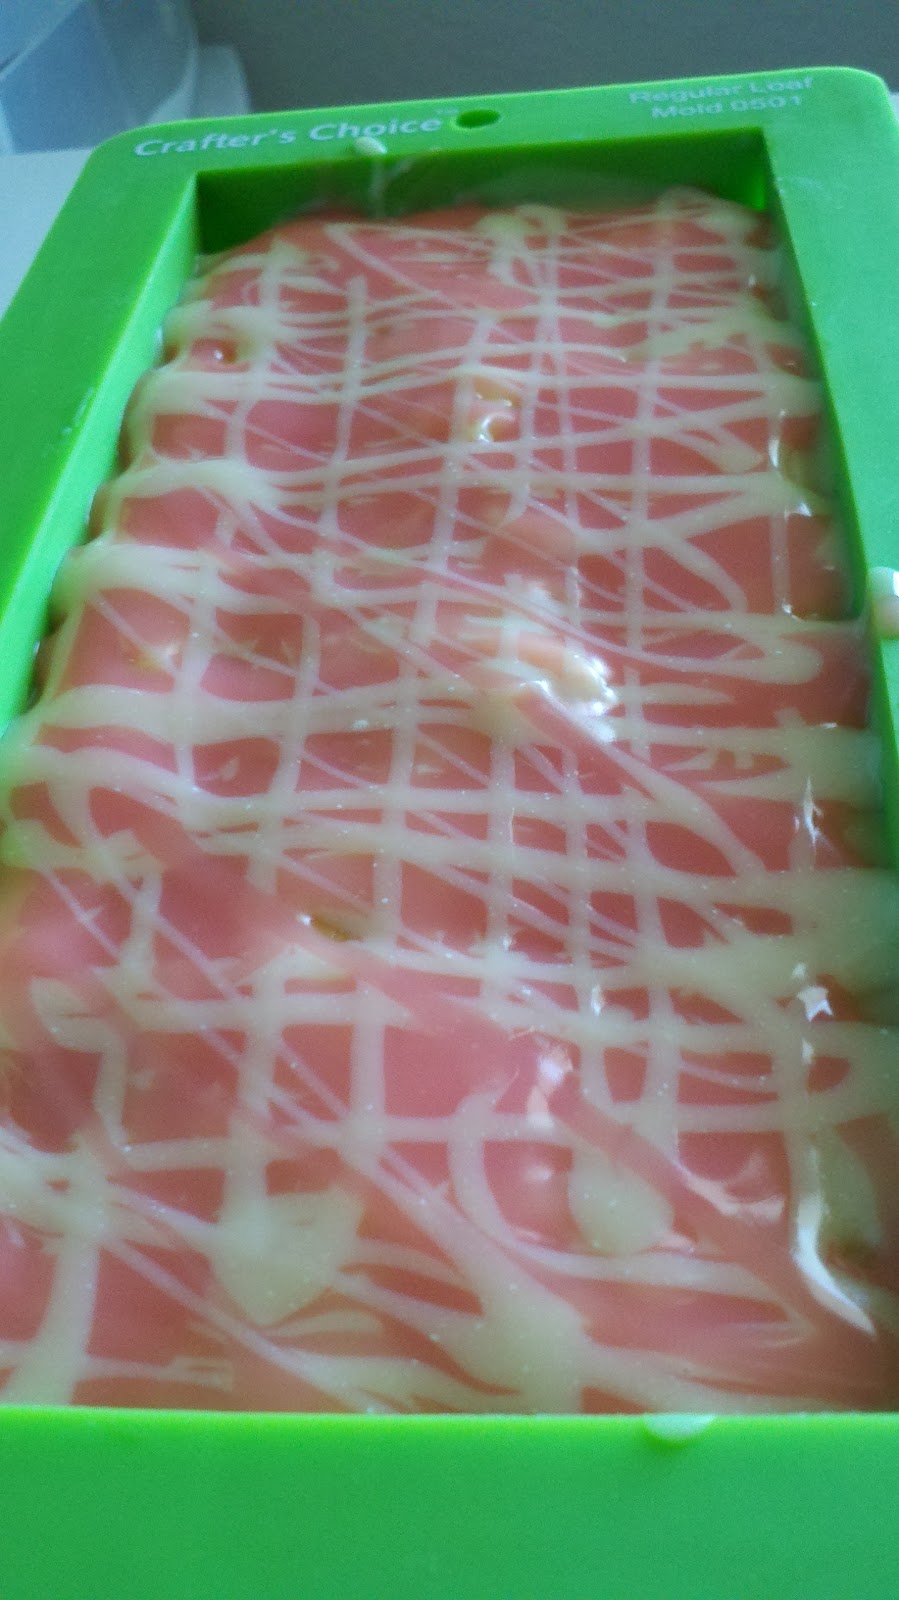 |
| In the mold. Oh, the anticipation! |
Honey adds to the humectant qualities of the glycerin already in the soap, but it also acts as an antimicrobial agent on your skin. It will help keep your skin clean and beautiful. Plus, the sugar in the honey will make the soap even more bubbly!
|
| Out of the mold and cut! |
To give them a little extra gorgeous factor and to remind you to feel your boobees regularly, I added a little pink on the top.
Wednesday, June 20, 2012
CFAM at Fine Arts Center
Today is my first Wednesday market at the Fine Arts Center. We are open from 3-7 this afternoon.
I'm taking Hayden with me, so I'm a little nervous. Unloading, setup, and selling with a toddler! I must be crazy :)
If you can, come out to see us today!
I'm taking Hayden with me, so I'm a little nervous. Unloading, setup, and selling with a toddler! I must be crazy :)
If you can, come out to see us today!
Tuesday, June 19, 2012
Honey
Honey is used world wide as a natural sweetener. However, honey is so much more than a sweet (delicious) liquid. Honey is also used in skin care because it offers a wide variety of benefits.
Honey has long been considered one of the best anti aging ingredients; Cleopatra was well known for her milk and honey baths. Honey is still used today in a variety of skin care products. It is used in lotions, cremes, masques, and (of course) bath soaks. You cannot deny the wonderful effects that honey has on skin.
Honey is an effective antiseptic, which helps keep skin clear and blemish free. Honey also contains a high level of antioxidants that help repair damage done by the elements and stress. Using honey as part of a skin care regime can actually leave your skin amazingly soft! Honey is also a humectant, which means it can help seal in moisture and draw moisture to itself.
Honey can easily be incorporated into your skin care regime with easy DIY recipes. For example, mix a little honey with some milk and egg white to make a gentle cleanser that will leave your skin soft and glowing. If you have very oily skin, try a little lemon juice instead of milk. You can also make a gentle toner with honey and aloe or witch hazel. There are too many options to list! Look for other ideas for masques, hair treatments, bath soaks, or anything else you can think of.
Try getting your honey fresh from a local beekeeper. It usually has a better flavor (because you need to eat some of it :) and you are supporting your local economy!
What is your favorite use of honey?
Honey has long been considered one of the best anti aging ingredients; Cleopatra was well known for her milk and honey baths. Honey is still used today in a variety of skin care products. It is used in lotions, cremes, masques, and (of course) bath soaks. You cannot deny the wonderful effects that honey has on skin.
Honey is an effective antiseptic, which helps keep skin clear and blemish free. Honey also contains a high level of antioxidants that help repair damage done by the elements and stress. Using honey as part of a skin care regime can actually leave your skin amazingly soft! Honey is also a humectant, which means it can help seal in moisture and draw moisture to itself.
 |
| Photo by Lithfin on Flickr |
Try getting your honey fresh from a local beekeeper. It usually has a better flavor (because you need to eat some of it :) and you are supporting your local economy!
What is your favorite use of honey?
Saturday, June 16, 2012
Decluttler Challenge: Week 23
I thought I was behind, but when I looked at it, I'm not!!! That makes me happy :)
For those of you that don't know what my Declutter Challenge is, check it out here. You can also follow my adventures if you wish by reading my decluttering posts.
This week almost didn't happen. I almost forgot! Can you believe I would do such a thing? Well, it has been a crazy, busy week. I've been preparing all week for my market that didn't happen because I had my dates wrong. Oh well, at least I'm ready.
Back to the point...this week's challenge did happen because I got an email about one of the items I posted on craigslist! Happy dance time...
Ok, so I got the email yesterday, I met her today and the water cooler is officially gone.
On a side note, I discovered #declutter on Twitter and I'll be sharing there as well.
Have you started decluttering? Remember, it is easy to start. It doesn't have to be big, just grab one item a week and make it leave your house (by hook or by crook). Take it to the trash, resale shop, craigslist, ebay, or whatever, just make that item leave! One item a week isn't too hard and before you know it, you'll be letting all sorts of things go.
If you have a story to share, I would love to here it!
For those of you that don't know what my Declutter Challenge is, check it out here. You can also follow my adventures if you wish by reading my decluttering posts.
This week almost didn't happen. I almost forgot! Can you believe I would do such a thing? Well, it has been a crazy, busy week. I've been preparing all week for my market that didn't happen because I had my dates wrong. Oh well, at least I'm ready.
Back to the point...this week's challenge did happen because I got an email about one of the items I posted on craigslist! Happy dance time...
Ok, so I got the email yesterday, I met her today and the water cooler is officially gone.
 |
| Bye bye! |
On a side note, I discovered #declutter on Twitter and I'll be sharing there as well.
Have you started decluttering? Remember, it is easy to start. It doesn't have to be big, just grab one item a week and make it leave your house (by hook or by crook). Take it to the trash, resale shop, craigslist, ebay, or whatever, just make that item leave! One item a week isn't too hard and before you know it, you'll be letting all sorts of things go.
If you have a story to share, I would love to here it!
Friday, June 15, 2012
Updoing My Booth
This will be my 3rd market season! I'm excited to be doing it again because I don't do enough business to have an actual store, but I love meeting customers. I have a few that make sure they find out when I'm going to the market, so they can find me! I love that I actually get to meet them and see them.
The first year, I decided to do the market at the last minute and I shared it with a friend. So, we didn't put a lot of thought into the display (check it out here). Last year, was insane with my little guy that wasn't quite 1 year! I had some ideas, but it was more of a mish mash and my display was a little sad. Not this year! I have been planning, scheming, and designed to come up with a display that all ties together. I wanted to share my progress today and then tomorrow, I will show you the finished booth.
Since this word honu is Hawaiian, I decided to design my booth with an island feel to it. My next decision was to use white and ocean blue for my set-up. My tablecloths have always been white twin size sheets. I keep thinking about getting actual tablecloths, but the sheets work so well and are easily replaced. I found a fabric dye that I fell in love with, it is Dylon's Bahama Blue. I mean the name says it all! So, my tablecloths will now be Bahama blue, not white.
Next, we to decide what to do with my fabulous shelves. One set was a shutter door that we cut in half and made into shelves and the other is a foldable set I found at a thrift store. The shutters were already white, but the shelf part was a blue that ended up being too dark. I found a tropical blue paint that I loved, but I didn't want it to be overwhelming. So, we decided to paint the shelves blue and then white; then we are going to scuff them up so a little blue shows through. The scuffing may not happen by tomorrow, but they are painted and looking lovely!
I also decided I needed better signs than I've used in the past. The plastic holders just wasn't cutting it. My inspiration was actually a little plaque in Hayden's room. It is a simple small piece of wood with a wooden dowel to hold it upright. So, we used some scrap wood in the garage, cut it up, sanded it, and now it is painted. I will write my signage on the wood in paint pens! I also decided to make a "Specials" board. I bought a from at Michael's, along with a pre-cut piece of plywood; the plywood is now chalkboard black and the frame is tropical blue! It will look so cute. I think I'm going to use ribbon to tie the board to my tent, but I'm not positive yet.
I still have to write out all of my signs, but the major part is all done! Stay tuned for my big reveal...
The first year, I decided to do the market at the last minute and I shared it with a friend. So, we didn't put a lot of thought into the display (check it out here). Last year, was insane with my little guy that wasn't quite 1 year! I had some ideas, but it was more of a mish mash and my display was a little sad. Not this year! I have been planning, scheming, and designed to come up with a display that all ties together. I wanted to share my progress today and then tomorrow, I will show you the finished booth.
Since this word honu is Hawaiian, I decided to design my booth with an island feel to it. My next decision was to use white and ocean blue for my set-up. My tablecloths have always been white twin size sheets. I keep thinking about getting actual tablecloths, but the sheets work so well and are easily replaced. I found a fabric dye that I fell in love with, it is Dylon's Bahama Blue. I mean the name says it all! So, my tablecloths will now be Bahama blue, not white.
 | |
| It is actually much more tropical! |
 |
| Everything out for painting! Love my shelves :) |
 | ||
| The sun is a little strong, but I love this blue! |
 |
| My first time using chalkboard paint! |
Subscribe to:
Posts (Atom)