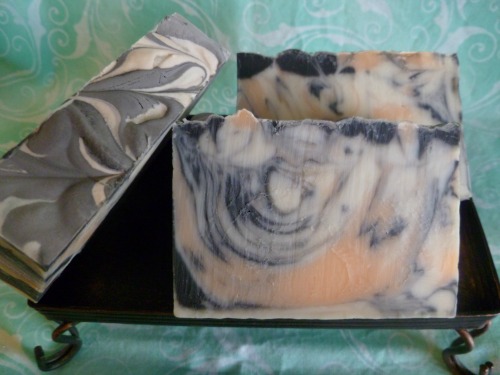
It has been a while since I've gotten to make soap! With all the craziness of moving, unpacking, traveling, school starting, and markets it just hasn't happened. But, today is one of those super-productive days for me! I have gotten quite a bit done at work, almost finished all the laundry, and I made some soap. I've been dying to make coffee soap again, but people didn't really like it without a scent. I finally found a coffee scent that I am just in love with, so my delectable Mocha Soap is back. Made with coffee, coffee ground, and cocoa butter this is the perfect soap for the kitchen or the shower. Did you know that coffee is actually great for absorbing icky smells, so it makes a great hand soap in the kitchen as well as a scrubby body soap in the shower.
These will be ready to go on 10/16! This is a small batch to see if people like it better than the original, so quantities will be limited.
Showing posts with label Honu Products. Show all posts
Sunday, September 15, 2013
Friday, June 14, 2013
Elemental Swirl Soap
Have you seen this technique? It is really cool! You create two layers of swirled soap! It is an advanced technique, but the results are lovely.
I've had a bit of a stressful time lately. I am getting ready to move. I have a newborn and a toddler and guess what? The toddler is acting out because of the attention that the baby gets. Surprised? I didn't figure you would be. There are a few other things going on, but that is not the point. The point is that I really wanted to make some soap that would really take some skill and concentration. I wanted to get my mind off of my poor, poor, pitiful me crap and be creative and artistic! So, I decided the elemental swirl technique would do the trick!
I decided to use a Monkey Farts fo because I like it! If you want a pick-me-up, sniff some fruit monkey farts. Heck, just say monkey farts. Monkey farts. *giggle* I also chose this fo because I knew it did not accelerate trace or rice or anything else funky. I used a basic oil mix of olive, coconut, and palm because I know how it acts at different temperatures. This is NOT a technique you should use when experimenting with anything new. That recipe = disaster!
Monkey Farts is a fruity blend, so I decided to go with light fruity colors. For the bottom layer I used green oxide (kiwi), yellow oxide (banana), and tangerine wow (mandarin). I used cocoa powder to create a vein separating the two layers. I thought about gold mica, but wanted more contrast. The top is pink oxide (grapefruit), brick red oxide (apple), and creamy uncolored soap (coconut). I also added a fired fuchsia and glitter to the top because I couldn't help myself.
To do this, you need lots of bowls and plenty of work time. Mix your oils, lye water, and fragrance and blend until just mixed (emulsified), not to trace! Pour about half off into another bowl (for top soap) and set aside.
Make the bottom half: Separate your first half of soap batter into thirds and color each. Next, use two of the colors to do an in-the-pot swirl into the third color. Pour into your mold!
Color vein: Put some cocoa in a tea strainer and lightly tap over the soap to get a thin vein of powder.
Make the top half: Take the second half of your soap batter and separate it into thirds. Color two of them. Do another in-the-pot swirl. Use a spatula or spoon and CAREFULLY pour this soap over the bottom layer. You are trying NOT to mess up your vein or first layer. Reserve a very small amount for the top.
Pour the reserve into a baggie and mix in some hot pink goodness. My original idea was to pipe the soap in a really cool top, but it wasn't thick enough. So, I was going to do a basic swirl on the top, but I had too much soap (and you can't waste it!). So, I ended up just pouring it on the top and sprinkling the glitter on it. I can't say I'm disappointed :)
These will be ready to go July 13th!
I've had a bit of a stressful time lately. I am getting ready to move. I have a newborn and a toddler and guess what? The toddler is acting out because of the attention that the baby gets. Surprised? I didn't figure you would be. There are a few other things going on, but that is not the point. The point is that I really wanted to make some soap that would really take some skill and concentration. I wanted to get my mind off of my poor, poor, pitiful me crap and be creative and artistic! So, I decided the elemental swirl technique would do the trick!
I decided to use a Monkey Farts fo because I like it! If you want a pick-me-up, sniff some fruit monkey farts. Heck, just say monkey farts. Monkey farts. *giggle* I also chose this fo because I knew it did not accelerate trace or rice or anything else funky. I used a basic oil mix of olive, coconut, and palm because I know how it acts at different temperatures. This is NOT a technique you should use when experimenting with anything new. That recipe = disaster!
Monkey Farts is a fruity blend, so I decided to go with light fruity colors. For the bottom layer I used green oxide (kiwi), yellow oxide (banana), and tangerine wow (mandarin). I used cocoa powder to create a vein separating the two layers. I thought about gold mica, but wanted more contrast. The top is pink oxide (grapefruit), brick red oxide (apple), and creamy uncolored soap (coconut). I also added a fired fuchsia and glitter to the top because I couldn't help myself.
To do this, you need lots of bowls and plenty of work time. Mix your oils, lye water, and fragrance and blend until just mixed (emulsified), not to trace! Pour about half off into another bowl (for top soap) and set aside.
Make the bottom half: Separate your first half of soap batter into thirds and color each. Next, use two of the colors to do an in-the-pot swirl into the third color. Pour into your mold!
Color vein: Put some cocoa in a tea strainer and lightly tap over the soap to get a thin vein of powder.
Make the top half: Take the second half of your soap batter and separate it into thirds. Color two of them. Do another in-the-pot swirl. Use a spatula or spoon and CAREFULLY pour this soap over the bottom layer. You are trying NOT to mess up your vein or first layer. Reserve a very small amount for the top.
Pour the reserve into a baggie and mix in some hot pink goodness. My original idea was to pipe the soap in a really cool top, but it wasn't thick enough. So, I was going to do a basic swirl on the top, but I had too much soap (and you can't waste it!). So, I ended up just pouring it on the top and sprinkling the glitter on it. I can't say I'm disappointed :)
These will be ready to go July 13th!
Wednesday, June 5, 2013
From The Soap Pot 6/5
Vanilla was my favorite smell today! I made my two favorite vanilla scented soaps. They will be ready July 6th.
Twilight Seduction Soap-smells like vanilla and mint
Serenity Soap-smells like vanilla and lavender.
Please note that each batch of soap is unique and these new ones may vary slightly from those pictured! It is an art after all :)
Twilight Seduction Soap-smells like vanilla and mint
Serenity Soap-smells like vanilla and lavender.
Please note that each batch of soap is unique and these new ones may vary slightly from those pictured! It is an art after all :)
Friday, May 17, 2013
From the Soap Pot 5/15
Oh, I've been having so much fun in my soap room! It smells so good in there right now. I have several soaps that are just about ready to go and will be added to my shops soon. I have also made some soaps that I know you just can't wait to get.
Karma Kollage: smells like patchouli! (ready June 1st)
Eucalyptus Mint: smells like eucalyptus and peppermint-contains oatmeal (ready June 1st)
Lemongrass Sage: smells like freshly mown lemons with a hint of garden fresh sage (ready June 1st)
Ambrosia: smells like oatmeal, milk, and honey-contains oatmeal, goat's milk, and honey :) (ready June 8th)
Carrot and Buttermilk: great face soap, smells lightly of ylang ylang, contains carrots, buttermilk, and willowbark extract (ready June 8th)
Karma Kollage: smells like patchouli! (ready June 1st)
Eucalyptus Mint: smells like eucalyptus and peppermint-contains oatmeal (ready June 1st)
Lemongrass Sage: smells like freshly mown lemons with a hint of garden fresh sage (ready June 1st)
Ambrosia: smells like oatmeal, milk, and honey-contains oatmeal, goat's milk, and honey :) (ready June 8th)
Carrot and Buttermilk: great face soap, smells lightly of ylang ylang, contains carrots, buttermilk, and willowbark extract (ready June 8th)
Thursday, May 16, 2013
Made Fresh and Ready To Go 5/14
Wednesday, May 15, 2013
Name That Soap
Okay, my batch of leather scented soap is almost ready to go, but it needs a name!
Suggestions are:
Suggestions are:
- HOG Soap
- Biker Bar
- Gentleman's Bar
- Saddle Soap (or Saddle Up)
- Bad Boy
- Chaps
Friday, May 10, 2013
Leopard Spot Soap
Amy Warden over at Great Cakes Soapworks did another one of her awesome soap challenges! I didn't get to participate in this one (again!). As you know, my little girl was due to make her appearance in early April, which meant that I was gearing up for maternity leave at school. Six weeks of lesson plans to put together! I don't think I've ever been that organized :) Well, I still made sure to check out all of her videos and the link ups to see everyone else's creations. There were some really cool soaps! I loved all of the ideas and can't wait to try the others, but I decided to try the leopard spots first (even though it was the last challenge).
I decided I would do my lemongrass soap, which I was changing just a bit. I decided that straight lemongrass was nice, but I wanted a little something more. I found a fragrance oil that gave me a brilliant idea...lemongrass with SAGE! I decided that I would go with colors that make sense...yellow and green! I also decided that I would use my plastic squeeze bottles and not baggies. This saves a little waste and they are easier to use.
My lemongrass soap has always been made with hemp seed oil, which will give it a slightly green color, and lemongrass essential oil, which makes the soap slightly yellow. The yellow definitely wins out and is really pretty without any color, but I wanted to add a bit more. I used green oxide for the green and yellow oxide to make the yellow a bit more yellow. To the main soap I added some titanium dioxide to lighten it. Otherwise, there wouldn't be much contrast between it and the yellow. {You might be thinking I could have just gone with a different color for the spots, BUT I just didn't want to}
I've worked with the lemongrass hemp soap, so I knew that it didn't trace fast; although, I think the sage may have made it a little faster, but I had a good amount of work time. In Amy's video, so does her stripes at a diagonal, but I decided to do my lengthwise in the mold. I put a small layer in the bottom of the mold and did my spots over it, then added the main soap, and continued. I did try to stagger my spots so they looked random and I really liked the control I had with the squeeze bottles!
As you can see, my spots don't look like leopard spots, but streaks. It still looks nice and smells WONDERFUL! However, it is NOT leopard spotted soap. I think my stripe soap was the perfect consistency, but the main soap base was too thick. When I very carefully spooned it over, I could see my stripes getting squished and spread out; even with soap spooned in between stripes for support! I think it was because I used the stick blender to get the titanium dioxide mixed in and in the squeeze bottles, I just shook them to mix the color.
I also separated out too much soap for the stripes. So, I had plenty of colored soap, but ran out of the main soap! So, you can see my really think layer of green and yellow on the top. My plan was to save a bit of the color and swirl the top, but it turned into more than a bit. Overall, I'm happy with the soap, but I know what I can do better next time.
This soap will be ready to go on June 1st! You can get it at my Webstore or my Etsy shop.
I decided I would do my lemongrass soap, which I was changing just a bit. I decided that straight lemongrass was nice, but I wanted a little something more. I found a fragrance oil that gave me a brilliant idea...lemongrass with SAGE! I decided that I would go with colors that make sense...yellow and green! I also decided that I would use my plastic squeeze bottles and not baggies. This saves a little waste and they are easier to use.
My lemongrass soap has always been made with hemp seed oil, which will give it a slightly green color, and lemongrass essential oil, which makes the soap slightly yellow. The yellow definitely wins out and is really pretty without any color, but I wanted to add a bit more. I used green oxide for the green and yellow oxide to make the yellow a bit more yellow. To the main soap I added some titanium dioxide to lighten it. Otherwise, there wouldn't be much contrast between it and the yellow. {You might be thinking I could have just gone with a different color for the spots, BUT I just didn't want to}
I've worked with the lemongrass hemp soap, so I knew that it didn't trace fast; although, I think the sage may have made it a little faster, but I had a good amount of work time. In Amy's video, so does her stripes at a diagonal, but I decided to do my lengthwise in the mold. I put a small layer in the bottom of the mold and did my spots over it, then added the main soap, and continued. I did try to stagger my spots so they looked random and I really liked the control I had with the squeeze bottles!
As you can see, my spots don't look like leopard spots, but streaks. It still looks nice and smells WONDERFUL! However, it is NOT leopard spotted soap. I think my stripe soap was the perfect consistency, but the main soap base was too thick. When I very carefully spooned it over, I could see my stripes getting squished and spread out; even with soap spooned in between stripes for support! I think it was because I used the stick blender to get the titanium dioxide mixed in and in the squeeze bottles, I just shook them to mix the color.
I also separated out too much soap for the stripes. So, I had plenty of colored soap, but ran out of the main soap! So, you can see my really think layer of green and yellow on the top. My plan was to save a bit of the color and swirl the top, but it turned into more than a bit. Overall, I'm happy with the soap, but I know what I can do better next time.
This soap will be ready to go on June 1st! You can get it at my Webstore or my Etsy shop.
Thursday, May 2, 2013
Calendula
What is calendula? It is a flower! A very lovely flower too. It is sometimes called pot marigold, but should not be confused with marigolds.
Why do you care? Because calendula is a wonderful plant with many therapeutic properties. First of all, it is actually edible. The petals make a wonderful addition to salad. I've heard that the tea is beneficial too; although, I've never tried it.
How do I use calendula? By infusing it in oil! There are other ways to use calendula topically, but this is my favorite. I infuse the herbs in olive oil and use it for just about everything. Calendula has antibacterical, antifungal, and anti-inflammatory properties; which makes it great for skin care. Some find it effective in treating eczema, acne, rashes, or even dry, cracked skin. You could use the infused oil directly on trouble spots or create a balm first.
To infuse oil with calendula you will need a double boiler, calendula petals, and a light oil. Put some water in the bottom of the double boiler. Put dried calendula petals in the top and pour enough oil to just cover the petals. Put the top into the bottom of the double boiler and place it over low heat for several hours. Be sure the bottom does not dry out. Then, strain the petals from the oil. I store mine in a glass jar in the fridge to make it last longer.
I use a calendula infused oil in Honu Naturals Tiny Heinie Balm and Salve. I also have a herbal lip balm that is in the testing phase and a cuticle balm that I'm trying out. So far, I think both are a big hit and will soon be available.
What are some other ways you use calendula?
Why do you care? Because calendula is a wonderful plant with many therapeutic properties. First of all, it is actually edible. The petals make a wonderful addition to salad. I've heard that the tea is beneficial too; although, I've never tried it.
How do I use calendula? By infusing it in oil! There are other ways to use calendula topically, but this is my favorite. I infuse the herbs in olive oil and use it for just about everything. Calendula has antibacterical, antifungal, and anti-inflammatory properties; which makes it great for skin care. Some find it effective in treating eczema, acne, rashes, or even dry, cracked skin. You could use the infused oil directly on trouble spots or create a balm first.
To infuse oil with calendula you will need a double boiler, calendula petals, and a light oil. Put some water in the bottom of the double boiler. Put dried calendula petals in the top and pour enough oil to just cover the petals. Put the top into the bottom of the double boiler and place it over low heat for several hours. Be sure the bottom does not dry out. Then, strain the petals from the oil. I store mine in a glass jar in the fridge to make it last longer.
I use a calendula infused oil in Honu Naturals Tiny Heinie Balm and Salve. I also have a herbal lip balm that is in the testing phase and a cuticle balm that I'm trying out. So far, I think both are a big hit and will soon be available.
What are some other ways you use calendula?
Thursday, April 25, 2013
From The Soap Pot
Ahh, it feels good to be making soap again! The past few months were so busy, it just didn't happen. Between Science Fair, getting ready for baby, and having baby I was always exhausted. I'm still exhausted, but I'm finding time to be creative and make my soap while the little one sleeps.
A few days ago I made my wonderful Dead Sea Mud Soap. It is made with Dead Sea mud (duh!) and the essential oils of peppermint, tea tree, rosemary, lemon, and grapefruit. I just love the way it leaves my skin feeling and I've had so many people tell me that it has helped them with their "problem" skin. I decided to make it round, I think face soap should be round. I don't know why, it just makes sense to me.
Next, I did a leather scented soap. I had intended for it to be mostly black and orange, with just a bit of white soap in it. I'm sure you can guess my inspiration :) However, I didn't make enough black and orange soap. Plus, my orange didn't come out quite as dark as I'd hoped. It looked great in the bowl, but not when I mixed it with the soap. For this batch, I did an In The Pot Swirl. You can see on the top, I save a little soap and did some swirls there as well. I think it looks nice, but I know what I'll do differently later. I had a lot of suggestions on names on Facebook, I think I will do a survey!
Today, I made another batch of one of my favorite. Lullaby Soap! It smells like a mix between Huggies lavender and chamomile bedtime stuff and baby powder. I love it. For this batch, I keep it simple. I divide the batch in two, color half pink and half blue. The blue is ultramarine blue from BB and the pink is a mix of fired up fuchsia, pink oxide, and red oxide (BB). I simply pour both colors at the same time on opposite sides of the mold. Then, I give the top a little swirl. Can't wait to cut it!
These will all be on my Etsy shop and my store in about a month when they are cured and ready to go!
A few days ago I made my wonderful Dead Sea Mud Soap. It is made with Dead Sea mud (duh!) and the essential oils of peppermint, tea tree, rosemary, lemon, and grapefruit. I just love the way it leaves my skin feeling and I've had so many people tell me that it has helped them with their "problem" skin. I decided to make it round, I think face soap should be round. I don't know why, it just makes sense to me.
Next, I did a leather scented soap. I had intended for it to be mostly black and orange, with just a bit of white soap in it. I'm sure you can guess my inspiration :) However, I didn't make enough black and orange soap. Plus, my orange didn't come out quite as dark as I'd hoped. It looked great in the bowl, but not when I mixed it with the soap. For this batch, I did an In The Pot Swirl. You can see on the top, I save a little soap and did some swirls there as well. I think it looks nice, but I know what I'll do differently later. I had a lot of suggestions on names on Facebook, I think I will do a survey!
Today, I made another batch of one of my favorite. Lullaby Soap! It smells like a mix between Huggies lavender and chamomile bedtime stuff and baby powder. I love it. For this batch, I keep it simple. I divide the batch in two, color half pink and half blue. The blue is ultramarine blue from BB and the pink is a mix of fired up fuchsia, pink oxide, and red oxide (BB). I simply pour both colors at the same time on opposite sides of the mold. Then, I give the top a little swirl. Can't wait to cut it!
These will all be on my Etsy shop and my store in about a month when they are cured and ready to go!
Thursday, March 28, 2013
New Baby Soap
I have been playing around with some ideas for a really gentle soap that is specially designed for baby skin. I truly love the Naked Shea soap, but I wanted something even gentler. I wanted something that was soothing, creamy, and skin loving.
Here is what I decided I needed:
I creamed the colloidal (finely ground) oatmeal into the goat milk before freezing, which I'm not sure was a good idea. While mixing goat milk and lye makes a stinky orange mess anyway, I think adding the oatmeal early also resulting in the orange speckles in the soap. It doesn't smell bad, so I don't think it is going to effect the quality of the final soap.
I melted the shea and cocoa butters over low heat and added them at light trace. I've noticed that sometimes when I used butters, the final bars can turn out grainy, so I treated these with the same care I would use if they were going into a balm.
I used a round mold because it seems that baby soap should be round. I don't know why I decided this, but I did. I'm glad I did, I think it looks perfect! I can't wait to be able to use one of these and give you some feedback on them. I probably wouldn't be so anxious if my target for this soap wasn't to very precious and delicate!
I don't have much of a name for it right now. The best I have is Baby Soap (oh yes, I'm that original) or Milk and Aloe Baby Soap (even better!). If you have any ideas, feel free to share.
Here is what I decided I needed:
- Aloe-who doesn't remember their mom keeping an aloe plant in the house and any time there was anything wrong, you got rubbed down with it?
- Goat milk-gives the soap a rich, creamy texture and adds to the skin-softening properties.
- Oatmeal-good for all sorts of skin problems, so it is going to be good for babies too.
- Super skin conditioning oils: I went with avocado, shea butter, and cocoa butter. How luxurious are those together? Even without all the other goodies, that would make a great bar of soap.
I creamed the colloidal (finely ground) oatmeal into the goat milk before freezing, which I'm not sure was a good idea. While mixing goat milk and lye makes a stinky orange mess anyway, I think adding the oatmeal early also resulting in the orange speckles in the soap. It doesn't smell bad, so I don't think it is going to effect the quality of the final soap.
I melted the shea and cocoa butters over low heat and added them at light trace. I've noticed that sometimes when I used butters, the final bars can turn out grainy, so I treated these with the same care I would use if they were going into a balm.
I used a round mold because it seems that baby soap should be round. I don't know why I decided this, but I did. I'm glad I did, I think it looks perfect! I can't wait to be able to use one of these and give you some feedback on them. I probably wouldn't be so anxious if my target for this soap wasn't to very precious and delicate!
I don't have much of a name for it right now. The best I have is Baby Soap (oh yes, I'm that original) or Milk and Aloe Baby Soap (even better!). If you have any ideas, feel free to share.
Tuesday, March 26, 2013
Soap Packaging Decision
If you recall, not too long ago I started rethinking my soap packaging...again. Really, I think this is a question that is discussed on EVERY soapmaking forum. In detail. You can read about my past packaging here.
After thinking about it and weighing the pros and cons, I finally made a decision. The feedback I received said I should keep the paper because it was simple, yet very pretty. I really did consider that. However, on my list of cons was the time it took to cut the paper and wrap each bar of soap. The pros was that it was fairly inexpensive; that is, until you add in the cost of the time it was taking to package the soap. Then, it was about even with the soap boxes.
Considering that I am now a single mom of soon-to-be 2 children, I really do have to consider time a lot more. I don't want to give up my soap business, but my time in more limited than before. (To be honest, I've been considering a lot of things that I could do to save time, but more on that later)
So, the soap boxes won out. All I have to do is pop the box open, tuck in one end, pop the soap in, tuck in the other end, and add a label. We are talking maybe 30 seconds per bar of soap. That is a HUGE difference! Plus, I can't deny that I do like the look of the soap boxes.
I am still planning on having other types of packaging. For example, I'm starting to make round soaps, but they wouldn't fit in a box. But, I will be using boxes as the main way to package soap.
What do you think? Do you like the boxes?
After thinking about it and weighing the pros and cons, I finally made a decision. The feedback I received said I should keep the paper because it was simple, yet very pretty. I really did consider that. However, on my list of cons was the time it took to cut the paper and wrap each bar of soap. The pros was that it was fairly inexpensive; that is, until you add in the cost of the time it was taking to package the soap. Then, it was about even with the soap boxes.
Considering that I am now a single mom of soon-to-be 2 children, I really do have to consider time a lot more. I don't want to give up my soap business, but my time in more limited than before. (To be honest, I've been considering a lot of things that I could do to save time, but more on that later)
So, the soap boxes won out. All I have to do is pop the box open, tuck in one end, pop the soap in, tuck in the other end, and add a label. We are talking maybe 30 seconds per bar of soap. That is a HUGE difference! Plus, I can't deny that I do like the look of the soap boxes.
I am still planning on having other types of packaging. For example, I'm starting to make round soaps, but they wouldn't fit in a box. But, I will be using boxes as the main way to package soap.
What do you think? Do you like the boxes?
Sunday, February 3, 2013
Soap Packaging Revisited
Is there a soap maker out there that hasn't gone back and forth about soap packaging? If so, please explain how you made this decision and was it easy?
For me, this has been the hardest part of soapmaking!
Here is my original packaging:
The cigar bands were easy, cheap, and created minimal packaging. Plus, the consumer could smell AND see the soaps before buying. However, they didn't protect the soaps well and I had problems with them slipping off or getting torn with moving them so much.
Next I tried shrink wrap bags:
The label was printed on cardstock, cut, then placed on the soap before it was shrink wrapped. The wrap is still cheap. The soaps were very protected and you could see what they looked like. But, you couldn't smell the soap and the shrink wrap was hard to get off. Plus, the bags were too large. So, you could get the end and have one end open (I'll tell you this didn't always work out so well if you weren't careful cutting) or tape the end down before shrinking (this didn't look great).
I've recently found soap bands for shrink wrap. They are open on both ends and already sized for most soaps, so you just center your soap and shrink wrap. They also have a perforated tab for easy opening. It also sounds like it is easy to make them smaller for smaller bars. So, that would solve the size problem, smelling problem, and the hard-to-get-open problem.
I decided to try using paper wrapping and really pretty paper bands:
I printed a label and stuck it to the paper. I won't lie, I LOVE the way these look. I used different handmade papers for different scents and simple colored paper underneath. The soaps are protected and you can smell them through the paper. It is also nice because I can make it fit any bar. But, I have to leave on unwrapped for people to see. Plus, the cutting and wrapping is a little labor intensive. With the number of bands I can get out of a sheet of handmade paper, it isn't too much more than shrink wrap, but then you add your time to that! Plus, buying different sheets of handmade paper for the soaps and making sure I don't run out is harder to keep up with.
Last option, soap boxes (never tried):
I've thought about boxes, but they are the more expensive option. On the plus side, your soap is well protected. It is easy to remove the soap to see and smell, but easy to put back as well. They are really easy to pop open, stuff your soap in and slap a label on. They are most commonly sold as white or kraft color and come with a variety of cut-outs. I even found a site that does colored boxes (expensive unless ordering A LOT!). My biggest concern with this option has been the cost and the fact that it would only be one size, so I'd have to figure out something else for smaller bars. However, the time I'd save compared to wrapping in paper may be worth it! I could also offer the option for no box online to save people money or maybe do a box recycling program (I haven't thought that one through much).
So, what do you think? I'm looking for an attractive, easy, cost-effective, consumer-friendly method for packaging my soaps. My options are shrink wrap bands (cheap, quick, see-through, multi-sizes), paper (BEAUTIFUL, labor-intensive, not too expensive, not see through, mulit-sizes), or boxes (more costly, quick, easy open, one-size).
Which option would you like to see or think would be the best for me?
For me, this has been the hardest part of soapmaking!
Here is my original packaging:
The cigar bands were easy, cheap, and created minimal packaging. Plus, the consumer could smell AND see the soaps before buying. However, they didn't protect the soaps well and I had problems with them slipping off or getting torn with moving them so much.
Next I tried shrink wrap bags:
The label was printed on cardstock, cut, then placed on the soap before it was shrink wrapped. The wrap is still cheap. The soaps were very protected and you could see what they looked like. But, you couldn't smell the soap and the shrink wrap was hard to get off. Plus, the bags were too large. So, you could get the end and have one end open (I'll tell you this didn't always work out so well if you weren't careful cutting) or tape the end down before shrinking (this didn't look great).
I've recently found soap bands for shrink wrap. They are open on both ends and already sized for most soaps, so you just center your soap and shrink wrap. They also have a perforated tab for easy opening. It also sounds like it is easy to make them smaller for smaller bars. So, that would solve the size problem, smelling problem, and the hard-to-get-open problem.
I decided to try using paper wrapping and really pretty paper bands:
I printed a label and stuck it to the paper. I won't lie, I LOVE the way these look. I used different handmade papers for different scents and simple colored paper underneath. The soaps are protected and you can smell them through the paper. It is also nice because I can make it fit any bar. But, I have to leave on unwrapped for people to see. Plus, the cutting and wrapping is a little labor intensive. With the number of bands I can get out of a sheet of handmade paper, it isn't too much more than shrink wrap, but then you add your time to that! Plus, buying different sheets of handmade paper for the soaps and making sure I don't run out is harder to keep up with.
Last option, soap boxes (never tried):
![]() |
| Pic from Elements Bath & Body |
I've thought about boxes, but they are the more expensive option. On the plus side, your soap is well protected. It is easy to remove the soap to see and smell, but easy to put back as well. They are really easy to pop open, stuff your soap in and slap a label on. They are most commonly sold as white or kraft color and come with a variety of cut-outs. I even found a site that does colored boxes (expensive unless ordering A LOT!). My biggest concern with this option has been the cost and the fact that it would only be one size, so I'd have to figure out something else for smaller bars. However, the time I'd save compared to wrapping in paper may be worth it! I could also offer the option for no box online to save people money or maybe do a box recycling program (I haven't thought that one through much).
So, what do you think? I'm looking for an attractive, easy, cost-effective, consumer-friendly method for packaging my soaps. My options are shrink wrap bands (cheap, quick, see-through, multi-sizes), paper (BEAUTIFUL, labor-intensive, not too expensive, not see through, mulit-sizes), or boxes (more costly, quick, easy open, one-size).
Which option would you like to see or think would be the best for me?
Monday, January 14, 2013
New Soap; Needs a Name...
I purchased an essential oil blend called "Mother Earth." It is a blend of Bergamot, Cassia Root, Cedarwood, Nutmeg, Lavadin, Peppermint! It is so good. I can't even describe it; maybe a little earthy, minty, spicy? I had meant to make the soap with it a while back, but that didn't happen.
I did get it done last weekend though!
I colored it with micas and oxides. My inspiration was the name of the eo blend! It is brown on the bottom (sort of, I should have mixed better), green in the middle and blue on top. I did a hanger swirl (check out how to do it here) to get my layers to mix a little. I really like the way it looks! I wasn't sure about the scent at first, but after curing for a few days, I love it. It is lightly scented because I didn't want to go overboard. It smells mostly minty, but the other scents come through nicely.
Can you think of any good names?
It will be available on the website around February 10th!
I did get it done last weekend though!
I colored it with micas and oxides. My inspiration was the name of the eo blend! It is brown on the bottom (sort of, I should have mixed better), green in the middle and blue on top. I did a hanger swirl (check out how to do it here) to get my layers to mix a little. I really like the way it looks! I wasn't sure about the scent at first, but after curing for a few days, I love it. It is lightly scented because I didn't want to go overboard. It smells mostly minty, but the other scents come through nicely.
Can you think of any good names?
It will be available on the website around February 10th!
Wednesday, January 9, 2013
My First Video-Ombre Soap Making
I made my first video a couple of months back. I did it on a whim, so it is a little rough. I had some friends over to visit and one watched Hayden while the other helped me make soap. We decided to record the session and see how it turned out.
After watching it, I decided not to post it. But, after thinking about it more, I figure "why not?" I had fun doing it. The soap turned out nice. Plus, my helper kept asking about it :)
Here is the link to my video.
ANNNNDDDD....
Here is a picture of the finished soap:
![]() |
| Lavender vanilla scented ombre soap. |
These looked so pretty and smelled awesome! I sold out really fast this past season.
Tuesday, December 11, 2012
Inventory is LOW!
WOW! I had an awesome Saturday at the CFAM holiday market!
I am almost out of many of my products. I am down to just a few items left! Most of my soaps are sold out, as are many of my lotions and tub treats! It was a crazy day, but I had a blast.
I am going to go through and inventory everything tonight and what I have left is going to be on sale for the next week! It might not happen, but I would love to sell out of everything before Christmas. That would make the year end inventory so much easier!
I will also have to ask for you to be a little patient with me. I am almost completely out of soaps. I will start making more of everything after the holidays, but soaps take a while to get ready. Everything else can be ready quickly, but soaps will take a little bit.
Keep your eyes open and check the website for an upcoming sale on all remaining items! (Yes, that was supposed to sound like a car commercial)
I am almost out of many of my products. I am down to just a few items left! Most of my soaps are sold out, as are many of my lotions and tub treats! It was a crazy day, but I had a blast.
I am going to go through and inventory everything tonight and what I have left is going to be on sale for the next week! It might not happen, but I would love to sell out of everything before Christmas. That would make the year end inventory so much easier!
I will also have to ask for you to be a little patient with me. I am almost completely out of soaps. I will start making more of everything after the holidays, but soaps take a while to get ready. Everything else can be ready quickly, but soaps will take a little bit.
Keep your eyes open and check the website for an upcoming sale on all remaining items! (Yes, that was supposed to sound like a car commercial)
Saturday, October 27, 2012
New Soaps Available!
We are in the process of putting up a new website, so I'm not adding the new seasonal soaps I made to the old one. But, I wanted to share them with you and give you the opportunity to get yours since they won't last long. If you are interested in any of these, feel free to send me an email at hmwalls (at) honunaturals (dot) com, or message me on facebook.
Pumpkin soaps, made from locally grown pumpkin!
Christmas Soaps
All seasonal scents can also be special ordered as fizzy tub treats or wax tarts for candle warmers.
Pumpkin soaps, made from locally grown pumpkin!
![]() |
| Chocolate Pumpkin soap that smells so good you might just need to lather again. Buy two and store one in the closet until you need it, no need for scented fabric softeners :) |
![]() |
| Pumpkin Spice soap is made with cinnamon, ginger, clove, and a touch of orange. |
All seasonal scents can also be special ordered as fizzy tub treats or wax tarts for candle warmers.
Monday, August 20, 2012
Babassu Oil
I've been looking into substituting some of the oils I use for other oils that would offer more skin care benefits and enhance the quality of my products. I've also been looking at creating products that contain more tropical ingredients because I want to tie everything into the name of my company.
One of the oils I came across is called babassu oil (Orbignya martiana). It comes from a palm tree in Brazil and can be used in place of palm or coconut oil in cosmetics. I like that it can be used in place of palm oil in soap, but I will admit, I haven't tried that yet. According to what I've found, babassu oil is good for all skin types. It is can be used on dry/damaged, mature, and even oily skin! It is so versatile that people are using it in all of their products.
I decided to try it in a lip balm. I substituted the hydrogenated soybean oil for babassu oil and I LOVE the feel of the lip balm. Soybean oil makes a good lip balm, but I have found that many of my customers were questioning whether it was non-GMO soybean (I was assured by the supplier that it was). Soybean is a good oil for normal skin, but doesn't offer that many extra skin care benefits. It really is a good, skin-softening oil, but I want to find some that are better.
The lip balm with the babassu oil has the same consistency, which I really like. It goes on just as smooth and stays on for a long time. However, my lips really do feel softer when I'm using that one! I use several different ones throughout the day, so I notice the slight difference between the new formula and the old.
The only lip balms currently made with babassu oil are my Orange Cream lip balms, but as I make new batches of the others, I will be substituting babassu oil for the soybean oil!
I can't wait to see how it feels in lotion!
One of the oils I came across is called babassu oil (Orbignya martiana). It comes from a palm tree in Brazil and can be used in place of palm or coconut oil in cosmetics. I like that it can be used in place of palm oil in soap, but I will admit, I haven't tried that yet. According to what I've found, babassu oil is good for all skin types. It is can be used on dry/damaged, mature, and even oily skin! It is so versatile that people are using it in all of their products.
I decided to try it in a lip balm. I substituted the hydrogenated soybean oil for babassu oil and I LOVE the feel of the lip balm. Soybean oil makes a good lip balm, but I have found that many of my customers were questioning whether it was non-GMO soybean (I was assured by the supplier that it was). Soybean is a good oil for normal skin, but doesn't offer that many extra skin care benefits. It really is a good, skin-softening oil, but I want to find some that are better.
The lip balm with the babassu oil has the same consistency, which I really like. It goes on just as smooth and stays on for a long time. However, my lips really do feel softer when I'm using that one! I use several different ones throughout the day, so I notice the slight difference between the new formula and the old.
The only lip balms currently made with babassu oil are my Orange Cream lip balms, but as I make new batches of the others, I will be substituting babassu oil for the soybean oil!
I can't wait to see how it feels in lotion!
Monday, July 30, 2012
Scent of Serenity
I recently hit upon a lavender vanilla blend that I just adore. It was hard to get them to blend just right.
At first, my lavender was overpowering or my vanilla was too sweet. I just couldn't get that delicious blend of herbal, yet sweet that I was looking for. I was using Hungarian lavender and Bramble Berry's vanilla select. I love the vanilla select because it is deeper and richer than most vanilla. But, I still couldn't get it right.
I ended up using 3 different vanillas, the barest hint of a sweeter sandalwood fo, and a fair amount of lavender. And I must say that I'm quite happy with the results!
First, I called it Lavender Vanilla Bliss. It really is a blissful scent :) However, that seemed like a very long name and I'm all about simplicity. So, I decided to change the name to Serenity. I thought it was pretty appropriate because it smells wonderful!
I currently have used Serenity to make lotion, soap (bar and liquid), and fizzing tub treats and I am truly loving the scent! There is just something about lavender and vanilla that makes everything better.
What is your favorite scent to blend with lavender?
At first, my lavender was overpowering or my vanilla was too sweet. I just couldn't get that delicious blend of herbal, yet sweet that I was looking for. I was using Hungarian lavender and Bramble Berry's vanilla select. I love the vanilla select because it is deeper and richer than most vanilla. But, I still couldn't get it right.
I ended up using 3 different vanillas, the barest hint of a sweeter sandalwood fo, and a fair amount of lavender. And I must say that I'm quite happy with the results!
First, I called it Lavender Vanilla Bliss. It really is a blissful scent :) However, that seemed like a very long name and I'm all about simplicity. So, I decided to change the name to Serenity. I thought it was pretty appropriate because it smells wonderful!
I currently have used Serenity to make lotion, soap (bar and liquid), and fizzing tub treats and I am truly loving the scent! There is just something about lavender and vanilla that makes everything better.
What is your favorite scent to blend with lavender?
Thursday, July 26, 2012
Tub Treats vs. Bath Bombs
The other day someone suggested I start making bath bombs. I replied that I don't make bath bombs, but I do make fizzing tub treats. They replied that I should still try to make bath bombs. It occurred to me that they probably don't know what fizzing tub treats are!
Fizzing tub treats are similar to bath bombs. They are made with similar ingredients that will soften skin while you soak. They both fizz when dropped in your bath water. Both can be scented to give you an aromatic experience in the tub.
That's great, but what is the difference? Bath bombs are usually held together by spritzing the powders with witch hazel and then letting them dry, some crafters do add butters or oils for added skincare benefits. Fizzing tub treats are held together using butters and oils that harden. Bath bombs are made by packing the moist powders in a mold and then removing. My tub treats are packed in a 6 cavity mold and left there, the keeps all 6 tub treats together until you are ready to use. Bath bombs are often sold individually and generally the entire thing is used at the same time (some can be carefully broken apart for multiple uses). Tub treats are packaged in sets of six small cubes, so you can easily decide how many to use in a bath. Plus, the tub treats are easy to store because they are conveniently packaged in a clamshell container with a lid. Like bath bombs they should be stored in a cool, dry location like a linen closet; the bathroom can be too moist and cause your tub treats or bath bombs to develop fizzing warts.
What do you like to add to your bath?
Fizzing tub treats are similar to bath bombs. They are made with similar ingredients that will soften skin while you soak. They both fizz when dropped in your bath water. Both can be scented to give you an aromatic experience in the tub.
![]() |
| Fizzing tub treats are conveniently packaged. You get 6 individual cubes, so you can chose what to add to your bath! |
What do you like to add to your bath?
Saturday, July 7, 2012
Twilight Seduction Soap
I made this soap last week and I have to say that I was surprised that I only got one comment about sparkling vampires. In truth, the name has nothing to do with vampires. I have three scents that I grouped together because they are deep, rich, and wonderful. The first, I decided to name Moonlight Temptation because one of the fragrances in the blend was called moonlight. I wanted the other two names to tie into the first. Moonlight is a dark chocolate blend and this one is vanilla, I wanted to come up with something to represent light.
I brainstormed dawn, daylight, sunrise, and a few others that didn't catch me. When twilight came to mind, I loved the name Twilight Seduction. I knew that most would assume it had something to do with the movies or books, but it truly doesn't. The three names I decided on are Moonlight Temptation, Twilight Seduction, and Midnight Enchantment. See, nothing to do with vampires.
Website Description:
I brainstormed dawn, daylight, sunrise, and a few others that didn't catch me. When twilight came to mind, I loved the name Twilight Seduction. I knew that most would assume it had something to do with the movies or books, but it truly doesn't. The three names I decided on are Moonlight Temptation, Twilight Seduction, and Midnight Enchantment. See, nothing to do with vampires.
![]() |
| I was going for the moon over the water with the colors of twilight. I even put moonlight shimmers in the water. Not bad for my first try! |
"Twilight
is that moment of time in between two opposing periods of each day. The time
when light still exists in the world as darkness slowly takes over and day
becomes night. To create the scent of twilight, warm vanilla and cool
peppermint are brought together to exist as that moment in which opposing
forces vie for your full attention. In that moment neither exists without the
other and you will be drawn into the seductive embrace of Twilight Seduction.
Shea
and cocoa butter create a creamy bar of soap that will leave behind silky soft
skin and take away that dry, itchy feeling. Let the thick lather surround you
as it washes away your worries and leave you feeling relaxed, refreshed, and
emotionally recharged."
Subscribe to:
Posts (Atom)