Oh, I've been having so much fun in my soap room! It smells so good in there right now. I have several soaps that are just about ready to go and will be added to my shops soon. I have also made some soaps that I know you just can't wait to get.
Karma Kollage: smells like patchouli! (ready June 1st)
Eucalyptus Mint: smells like eucalyptus and peppermint-contains oatmeal (ready June 1st)
Lemongrass Sage: smells like freshly mown lemons with a hint of garden fresh sage (ready June 1st)
Ambrosia: smells like oatmeal, milk, and honey-contains oatmeal, goat's milk, and honey :) (ready June 8th)
Carrot and Buttermilk: great face soap, smells lightly of ylang ylang, contains carrots, buttermilk, and willowbark extract (ready June 8th)
Friday, May 17, 2013
Thursday, May 16, 2013
Made Fresh and Ready To Go 5/14
Flip flop season is here again! Make sure your feet are ready to be shown by giving them a little extra care and attention. Our Ped-Cure Foot Balm will help keep your feet soft and beautiful this summer. Get yours now!

Webstore
Etsy

Etsy


Wednesday, May 15, 2013
Name That Soap
Okay, my batch of leather scented soap is almost ready to go, but it needs a name!
Suggestions are:
 Go to my Facebook page to vote for your favorite name. Everyone that votes will be placed in a drawing to win a free bar of soap!
Suggestions are:
- HOG Soap
- Biker Bar
- Gentleman's Bar
- Saddle Soap (or Saddle Up)
- Bad Boy
- Chaps
Friday, May 10, 2013
Leopard Spot Soap
Amy Warden over at Great Cakes Soapworks did another one of her awesome soap challenges! I didn't get to participate in this one (again!). As you know, my little girl was due to make her appearance in early April, which meant that I was gearing up for maternity leave at school. Six weeks of lesson plans to put together! I don't think I've ever been that organized :) Well, I still made sure to check out all of her videos and the link ups to see everyone else's creations. There were some really cool soaps! I loved all of the ideas and can't wait to try the others, but I decided to try the leopard spots first (even though it was the last challenge).
I decided I would do my lemongrass soap, which I was changing just a bit. I decided that straight lemongrass was nice, but I wanted a little something more. I found a fragrance oil that gave me a brilliant idea...lemongrass with SAGE! I decided that I would go with colors that make sense...yellow and green! I also decided that I would use my plastic squeeze bottles and not baggies. This saves a little waste and they are easier to use.
My lemongrass soap has always been made with hemp seed oil, which will give it a slightly green color, and lemongrass essential oil, which makes the soap slightly yellow. The yellow definitely wins out and is really pretty without any color, but I wanted to add a bit more. I used green oxide for the green and yellow oxide to make the yellow a bit more yellow. To the main soap I added some titanium dioxide to lighten it. Otherwise, there wouldn't be much contrast between it and the yellow. {You might be thinking I could have just gone with a different color for the spots, BUT I just didn't want to}
I've worked with the lemongrass hemp soap, so I knew that it didn't trace fast; although, I think the sage may have made it a little faster, but I had a good amount of work time. In Amy's video, so does her stripes at a diagonal, but I decided to do my lengthwise in the mold. I put a small layer in the bottom of the mold and did my spots over it, then added the main soap, and continued. I did try to stagger my spots so they looked random and I really liked the control I had with the squeeze bottles!

As you can see, my spots don't look like leopard spots, but streaks. It still looks nice and smells WONDERFUL! However, it is NOT leopard spotted soap. I think my stripe soap was the perfect consistency, but the main soap base was too thick. When I very carefully spooned it over, I could see my stripes getting squished and spread out; even with soap spooned in between stripes for support! I think it was because I used the stick blender to get the titanium dioxide mixed in and in the squeeze bottles, I just shook them to mix the color.
I also separated out too much soap for the stripes. So, I had plenty of colored soap, but ran out of the main soap! So, you can see my really think layer of green and yellow on the top. My plan was to save a bit of the color and swirl the top, but it turned into more than a bit. Overall, I'm happy with the soap, but I know what I can do better next time.
This soap will be ready to go on June 1st! You can get it at my Webstore or my Etsy shop.
I decided I would do my lemongrass soap, which I was changing just a bit. I decided that straight lemongrass was nice, but I wanted a little something more. I found a fragrance oil that gave me a brilliant idea...lemongrass with SAGE! I decided that I would go with colors that make sense...yellow and green! I also decided that I would use my plastic squeeze bottles and not baggies. This saves a little waste and they are easier to use.
My lemongrass soap has always been made with hemp seed oil, which will give it a slightly green color, and lemongrass essential oil, which makes the soap slightly yellow. The yellow definitely wins out and is really pretty without any color, but I wanted to add a bit more. I used green oxide for the green and yellow oxide to make the yellow a bit more yellow. To the main soap I added some titanium dioxide to lighten it. Otherwise, there wouldn't be much contrast between it and the yellow. {You might be thinking I could have just gone with a different color for the spots, BUT I just didn't want to}
I've worked with the lemongrass hemp soap, so I knew that it didn't trace fast; although, I think the sage may have made it a little faster, but I had a good amount of work time. In Amy's video, so does her stripes at a diagonal, but I decided to do my lengthwise in the mold. I put a small layer in the bottom of the mold and did my spots over it, then added the main soap, and continued. I did try to stagger my spots so they looked random and I really liked the control I had with the squeeze bottles!

As you can see, my spots don't look like leopard spots, but streaks. It still looks nice and smells WONDERFUL! However, it is NOT leopard spotted soap. I think my stripe soap was the perfect consistency, but the main soap base was too thick. When I very carefully spooned it over, I could see my stripes getting squished and spread out; even with soap spooned in between stripes for support! I think it was because I used the stick blender to get the titanium dioxide mixed in and in the squeeze bottles, I just shook them to mix the color.
I also separated out too much soap for the stripes. So, I had plenty of colored soap, but ran out of the main soap! So, you can see my really think layer of green and yellow on the top. My plan was to save a bit of the color and swirl the top, but it turned into more than a bit. Overall, I'm happy with the soap, but I know what I can do better next time.
This soap will be ready to go on June 1st! You can get it at my Webstore or my Etsy shop.
Thursday, May 2, 2013
Calendula
What is calendula? It is a flower! A very lovely flower too. It is sometimes called pot marigold, but should not be confused with marigolds.
Why do you care? Because calendula is a wonderful plant with many therapeutic properties. First of all, it is actually edible. The petals make a wonderful addition to salad. I've heard that the tea is beneficial too; although, I've never tried it.
How do I use calendula? By infusing it in oil! There are other ways to use calendula topically, but this is my favorite. I infuse the herbs in olive oil and use it for just about everything. Calendula has antibacterical, antifungal, and anti-inflammatory properties; which makes it great for skin care. Some find it effective in treating eczema, acne, rashes, or even dry, cracked skin. You could use the infused oil directly on trouble spots or create a balm first.

To infuse oil with calendula you will need a double boiler, calendula petals, and a light oil. Put some water in the bottom of the double boiler. Put dried calendula petals in the top and pour enough oil to just cover the petals. Put the top into the bottom of the double boiler and place it over low heat for several hours. Be sure the bottom does not dry out. Then, strain the petals from the oil. I store mine in a glass jar in the fridge to make it last longer.
I use a calendula infused oil in Honu Naturals Tiny Heinie Balm and Salve. I also have a herbal lip balm that is in the testing phase and a cuticle balm that I'm trying out. So far, I think both are a big hit and will soon be available.
What are some other ways you use calendula?
Why do you care? Because calendula is a wonderful plant with many therapeutic properties. First of all, it is actually edible. The petals make a wonderful addition to salad. I've heard that the tea is beneficial too; although, I've never tried it.
How do I use calendula? By infusing it in oil! There are other ways to use calendula topically, but this is my favorite. I infuse the herbs in olive oil and use it for just about everything. Calendula has antibacterical, antifungal, and anti-inflammatory properties; which makes it great for skin care. Some find it effective in treating eczema, acne, rashes, or even dry, cracked skin. You could use the infused oil directly on trouble spots or create a balm first.

To infuse oil with calendula you will need a double boiler, calendula petals, and a light oil. Put some water in the bottom of the double boiler. Put dried calendula petals in the top and pour enough oil to just cover the petals. Put the top into the bottom of the double boiler and place it over low heat for several hours. Be sure the bottom does not dry out. Then, strain the petals from the oil. I store mine in a glass jar in the fridge to make it last longer.
I use a calendula infused oil in Honu Naturals Tiny Heinie Balm and Salve. I also have a herbal lip balm that is in the testing phase and a cuticle balm that I'm trying out. So far, I think both are a big hit and will soon be available.
What are some other ways you use calendula?
Tuesday, April 30, 2013
Spring Cleaning-Several Weeks
You may remember that I started my Spring Cleaning a little early. I found a list on Pinterest for the 21 Day Organization Challenge (read about it here). I tweaked my list a bit to make it fit my needs. I was doing pretty well getting through it and blogging about it. But, as you know, many things got in the way of the blogging. However, I did continue to get cleaning done.
Now, I can't go through my list with you because I apparently decided that it needed to be recycled. I remember doing it, but I can't remember my reasoning at all. I blame the sleep deprivation that comes with newborns.
However, I can use the list off Pinterest and give you an update.
How do you go about Spring Cleaning?
Now, I can't go through my list with you because I apparently decided that it needed to be recycled. I remember doing it, but I can't remember my reasoning at all. I blame the sleep deprivation that comes with newborns.
However, I can use the list off Pinterest and give you an update.
- Medicine cabinet-done!
- Coat closet-don't have one, but did the hall closet instead,
- Under the beds-I actually don't store stuff there.
- Laundry room-done when we had that little flooding issue.
- Handbag-I have a very small one, so I clean it out constantly. I also cleaned out the diaper bag and backpack I use for zoo outings.
- Under sinks-bathrooms, yes; kitchen, still on the to-do list.
- Fridge/freezer-actually got a new (used) fridge at a garage sale. Is that cheating?
- Kitchen cabinets-done!
- Make-up case-again, it is a small one, so it gets cleaned out regularly too.
- Bedroom closets-with all the rearranging for the new baby, definitely!
- Garage-not even close; will do garage sale soon :)
- Craft supplies-no; to be honest, the area looks ok, so I'm not worried about it.
- Soap room-YES! It looks so nice and is easy to work in again!
- Backyard-yes and no; I need to clean up doggie mess, but it is clean.
- Bedroom dressers-again, with all the rearranging of dressers for the baby, yes it got done.
- Jewelry Box-done when I made my jewelry rack (check it out here).
- Living Room-done when the laundry room was cleaned because of flooding.
- Office-yes and no; I have organized everything into groups and know what needs to be done with everything, I just haven't gotten everything put away.
- Car-All the trash and extra things that don't belong have been removed. However, it hasn't been vacuumed and cleaned. I was waiting for the snow to stop before taking it to the car wash.
- Playroom-done; I made my toddler help me clean this area out.
- Enjoy an organized house!
How do you go about Spring Cleaning?
Thursday, April 25, 2013
From The Soap Pot
Ahh, it feels good to be making soap again! The past few months were so busy, it just didn't happen. Between Science Fair, getting ready for baby, and having baby I was always exhausted. I'm still exhausted, but I'm finding time to be creative and make my soap while the little one sleeps.
A few days ago I made my wonderful Dead Sea Mud Soap. It is made with Dead Sea mud (duh!) and the essential oils of peppermint, tea tree, rosemary, lemon, and grapefruit. I just love the way it leaves my skin feeling and I've had so many people tell me that it has helped them with their "problem" skin. I decided to make it round, I think face soap should be round. I don't know why, it just makes sense to me.
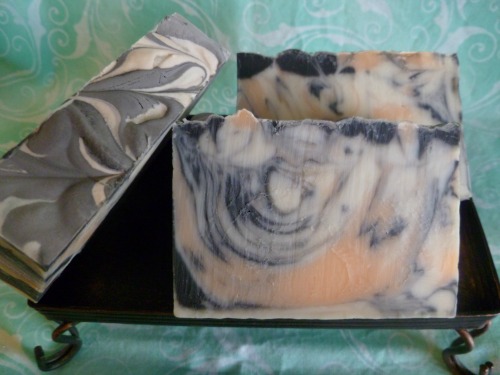
 Next, I did a leather scented soap. I had intended for it to be mostly black and orange, with just a bit of white soap in it. I'm sure you can guess my inspiration :) However, I didn't make enough black and orange soap. Plus, my orange didn't come out quite as dark as I'd hoped. It looked great in the bowl, but not when I mixed it with the soap. For this batch, I did an In The Pot Swirl. You can see on the top, I save a little soap and did some swirls there as well. I think it looks nice, but I know what I'll do differently later. I had a lot of suggestions on names on Facebook, I think I will do a survey!
 Today, I made another batch of one of my favorite. Lullaby Soap! It smells like a mix between Huggies lavender and chamomile bedtime stuff and baby powder. I love it. For this batch, I keep it simple. I divide the batch in two, color half pink and half blue. The blue is ultramarine blue from BB and the pink is a mix of fired up fuchsia, pink oxide, and red oxide (BB). I simply pour both colors at the same time on opposite sides of the mold. Then, I give the top a little swirl. Can't wait to cut it!
 These will all be on my Etsy shop and my store in about a month when they are cured and ready to go!
A few days ago I made my wonderful Dead Sea Mud Soap. It is made with Dead Sea mud (duh!) and the essential oils of peppermint, tea tree, rosemary, lemon, and grapefruit. I just love the way it leaves my skin feeling and I've had so many people tell me that it has helped them with their "problem" skin. I decided to make it round, I think face soap should be round. I don't know why, it just makes sense to me.


Subscribe to:
Posts (Atom)