Showing posts with label Sweet Swirls. Show all posts

Friday, June 14, 2013

Elemental Swirl Soap

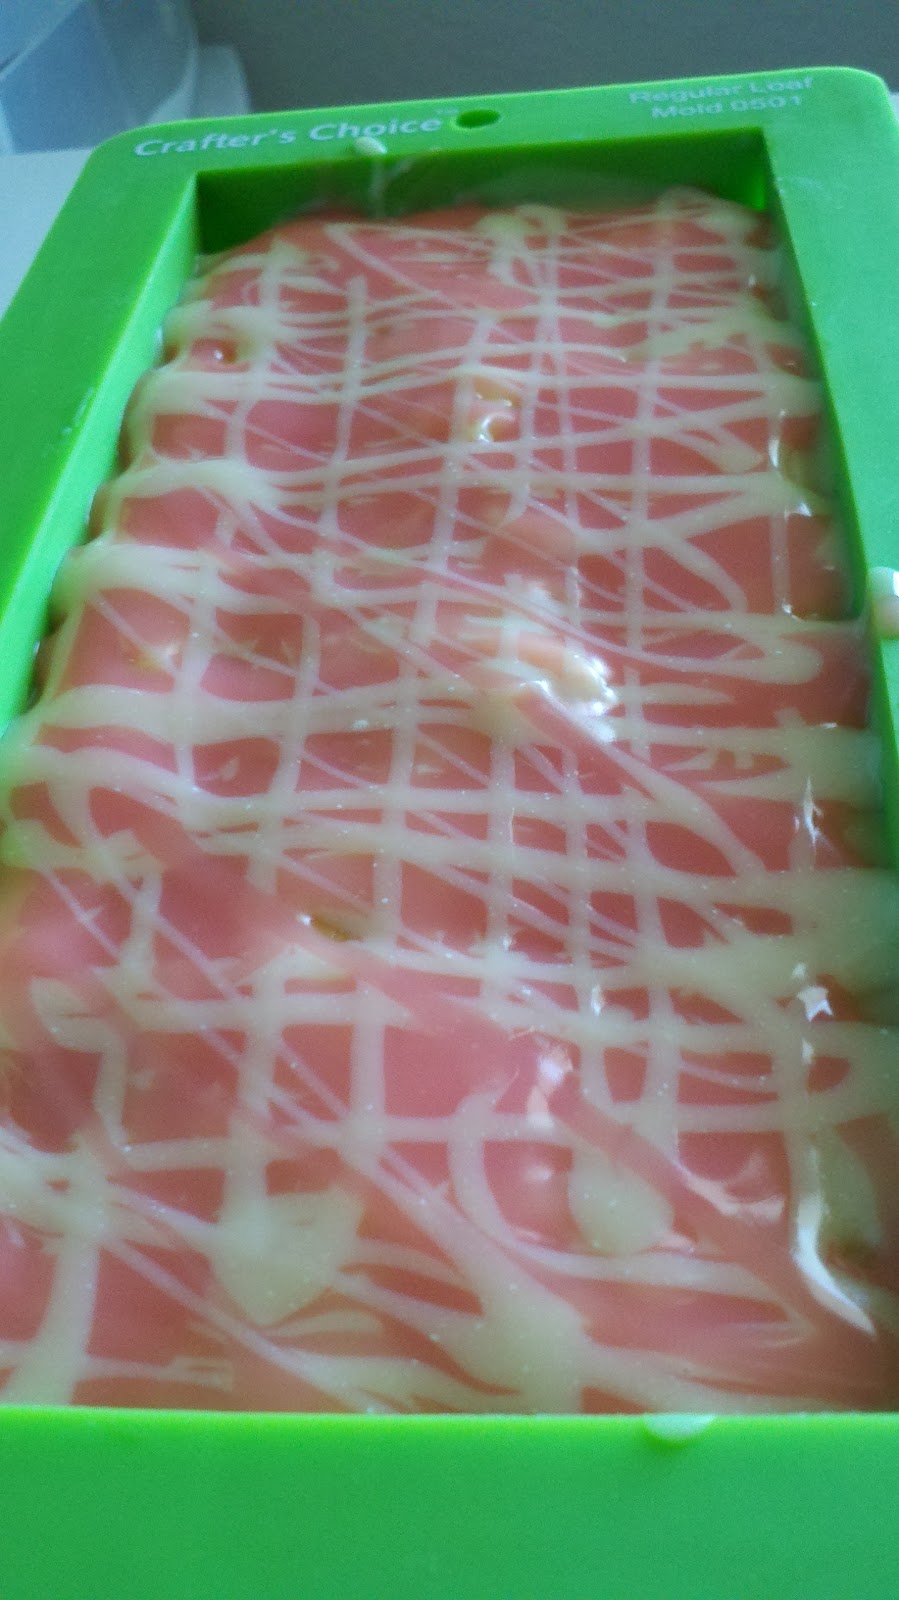
Have you seen this technique? It is really cool! You create two layers of swirled soap! It is an advanced technique, but the results are lovely.

I've had a bit of a stressful time lately. I am getting ready to move. I have a newborn and a toddler and guess what? The toddler is acting out because of the attention that the baby gets. Surprised? I didn't figure you would be. There are a few other things going on, but that is not the point. The point is that I really wanted to make some soap that would really take some skill and concentration. I wanted to get my mind off of my poor, poor, pitiful me crap and be creative and artistic! So, I decided the elemental swirl technique would do the trick!

I decided to use a Monkey Farts fo because I like it! If you want a pick-me-up, sniff some fruit monkey farts. Heck, just say monkey farts. Monkey farts. *giggle* I also chose this fo because I knew it did not accelerate trace or rice or anything else funky. I used a basic oil mix of olive, coconut, and palm because I know how it acts at different temperatures. This is NOT a technique you should use when experimenting with anything new. That recipe = disaster!

Monkey Farts is a fruity blend, so I decided to go with light fruity colors. For the bottom layer I used green oxide (kiwi), yellow oxide (banana), and tangerine wow (mandarin). I used cocoa powder to create a vein separating the two layers. I thought about gold mica, but wanted more contrast. The top is pink oxide (grapefruit), brick red oxide (apple), and creamy uncolored soap (coconut). I also added a fired fuchsia and glitter to the top because I couldn't help myself.

To do this, you need lots of bowls and plenty of work time. Mix your oils, lye water, and fragrance and blend until just mixed (emulsified), not to trace! Pour about half off into another bowl (for top soap) and set aside.

Make the bottom half: Separate your first half of soap batter into thirds and color each. Next, use two of the colors to do an in-the-pot swirl into the third color. Pour into your mold!

Color vein: Put some cocoa in a tea strainer and lightly tap over the soap to get a thin vein of powder.

Make the top half: Take the second half of your soap batter and separate it into thirds. Color two of them. Do another in-the-pot swirl. Use a spatula or spoon and CAREFULLY pour this soap over the bottom layer. You are trying NOT to mess up your vein or first layer. Reserve a very small amount for the top.

Pour the reserve into a baggie and mix in some hot pink goodness. My original idea was to pipe the soap in a really cool top, but it wasn't thick enough. So, I was going to do a basic swirl on the top, but I had too much soap (and you can't waste it!). So, I ended up just pouring it on the top and sprinkling the glitter on it. I can't say I'm disappointed :)

These will be ready to go July 13th!

Wednesday, June 12, 2013

Vanilla Discoloration

I have had several customers ask how I got such a lovely brown color for my soap. I've also had some that want to know why I would make brown soap. And there are a few that would like a vanilla scented something that looks creamy white like vanilla ice cream.

Where did the brown come from? From vanilla! Why did I color it brown? Because it has vanilla in it! Vanilla contains vanillin which will slowly cause anything that contains vanilla to discolor. The amount of discoloration depends on the amount of vanillin used. Discoloration can range from a light tan to a very dark brown.

Vanilla color stabilizers can slow the discoloration, but they won't stop it forever. You also have to make sure you get a stabilizer for the soap you are making. M&P stabilizers don't work well in CP (I tried anyway, they were right though, it doesn't work well).

For the most part, I don't fight the discoloration. Instead, I use it to design my soap. For example, in my lavender vanilla soap, I used titanium dioxide and the natural discoloration to make an ombre soap. I love the way it looks too! See how I did it here.

I used BB Vanilla Select and a vanilla bourbon fo and lavender eo. It actually starts to discolor right away! Here in the final soap right after it is cut and through day 5. It won't really get much darker than that.


I love the final look and you can see what a huge difference the vanilla makes, but it really creates lovely layers!

You can also separate your soap and use vanilla in one part of it to make a different look. Really, why fight the vanilla? Just use it to make a beautiful soap :)

What do you do about discoloring vanilla?

Wednesday, June 5, 2013

From The Soap Pot 6/5

Vanilla was my favorite smell today! I made my two favorite vanilla scented soaps. They will be ready July 6th.

Twilight Seduction Soap-smells like vanilla and mint

Serenity Soap-smells like vanilla and lavender.


 Please note that each batch of soap is unique and these new ones may vary slightly from those pictured! It is an art after all :)


Friday, May 10, 2013

Leopard Spot Soap

Amy Warden over at Great Cakes Soapworks did another one of her awesome soap challenges! I didn't get to participate in this one (again!). As you know, my little girl was due to make her appearance in early April, which meant that I was gearing up for maternity leave at school. Six weeks of lesson plans to put together! I don't think I've ever been that organized :) Well, I still made sure to check out all of her videos and the link ups to see everyone else's creations. There were some really cool soaps! I loved all of the ideas and can't wait to try the others, but I decided to try the leopard spots first (even though it was the last challenge).

I decided I would do my lemongrass soap, which I was changing just a bit. I decided that straight lemongrass was nice, but I wanted a little something more. I found a fragrance oil that gave me a brilliant idea...lemongrass with SAGE! I decided that I would go with colors that make sense...yellow and green! I also decided that I would use my plastic squeeze bottles and not baggies. This saves a little waste and they are easier to use.

My lemongrass soap has always been made with hemp seed oil, which will give it a slightly green color, and lemongrass essential oil, which makes the soap slightly yellow. The yellow definitely wins out and is really pretty without any color, but I wanted to add a bit more. I used green oxide for the green and yellow oxide to make the yellow a bit more yellow. To the main soap I added some titanium dioxide to lighten it. Otherwise, there wouldn't be much contrast between it and the yellow. {You might be thinking I could have just gone with a different color for the spots, BUT I just didn't want to}

I've worked with the lemongrass hemp soap, so I knew that it didn't trace fast; although, I think the sage may have made it a little faster, but I had a good amount of work time. In Amy's video, so does her stripes at a diagonal, but I decided to do my lengthwise in the mold. I put a small layer in the bottom of the mold and did my spots over it, then added the main soap, and continued. I did try to stagger my spots so they looked random and I really liked the control I had with the squeeze bottles!

As you can see, my spots don't look like leopard spots, but streaks. It still looks nice and smells WONDERFUL! However, it is NOT leopard spotted soap. I think my stripe soap was the perfect consistency, but the main soap base was too thick. When I very carefully spooned it over, I could see my stripes getting squished and spread out; even with soap spooned in between stripes for support! I think it was because I used the stick blender to get the titanium dioxide mixed in and in the squeeze bottles, I just shook them to mix the color.

I also separated out too much soap for the stripes. So, I had plenty of colored soap, but ran out of the main soap! So, you can see my really think layer of green and yellow on the top. My plan was to save a bit of the color and swirl the top, but it turned into more than a bit. Overall, I'm happy with the soap, but I know what I can do better next time.

This soap will be ready to go on June 1st! You can get it at my Webstore or my Etsy shop.

Thursday, April 25, 2013

From The Soap Pot

Ahh, it feels good to be making soap again! The past few months were so busy, it just didn't happen. Between Science Fair, getting ready for baby, and having baby I was always exhausted. I'm still exhausted, but I'm finding time to be creative and make my soap while the little one sleeps.

A few days ago I made my wonderful Dead Sea Mud Soap. It is made with Dead Sea mud (duh!) and the essential oils of peppermint, tea tree, rosemary, lemon, and grapefruit. I just love the way it leaves my skin feeling and I've had so many people tell me that it has helped them with their "problem" skin. I decided to make it round, I think face soap should be round. I don't know why, it just makes sense to me.
Next, I did a leather scented soap. I had intended for it to be mostly black and orange, with just a bit of white soap in it. I'm sure you can guess my inspiration :) However, I didn't make enough black and orange soap. Plus, my orange didn't come out quite as dark as I'd hoped. It looked great in the bowl, but not when I mixed it with the soap. For this batch, I did an In The Pot Swirl. You can see on the top, I save a little soap and did some swirls there as well. I think it looks nice, but I know what I'll do differently later. I had a lot of suggestions on names on Facebook, I think I will do a survey!
Today, I made another batch of one of my favorite. Lullaby Soap! It smells like a mix between Huggies lavender and chamomile bedtime stuff and baby powder. I love it. For this batch, I keep it simple. I divide the batch in two, color half pink and half blue. The blue is ultramarine blue from BB and the pink is a mix of fired up fuchsia, pink oxide, and red oxide (BB). I simply pour both colors at the same time on opposite sides of the mold. Then, I give the top a little swirl. Can't wait to cut it!
These will all be on my Etsy shop and my store in about a month when they are cured and ready to go!

Wednesday, January 30, 2013

CP/MP (Magma) Soap

I have been playing with the idea of incorporating MP soap into my cold process soap. I've seen some cute ideas using embedded shapes and such. I also found a tutorial on the Soap Queen blog about magma soap.

In magma soap, you don't create shaped embeds made from MP soap, but you pour it in the soap with your CP soap, just like you would for normal CP swirls. Hmmm...sounds interesting!

I decided to give this a try with a Valentine's Day inspired soap. {Side note: I love making holiday soaps because I can experiment with whatever I want and people know they won't be back until next year. Usually, they don't even mind if it isn't the same soap next year! Now, back to the point...} I love making soap using pinks and reds. There is something about those colors that I just adore. I will probably never decorate my house with them, but I love them anyway. Well, this year, I decided to throw in a little purple too!

The fragrance I chose has a higher vanilin content, so it will discolor. I used a color stablilizer (actually made for MP, but it usually works well enough in CP) to keep it from turning brown. I used clear MP soap colored with a pink mica that looked so lovely that I thought of another project from it. I separated my CP soap into 4 containers; one I left uncolored (I probably should have added titanium dioxide to make it white, but I didn't), one was red oxide, another fired up fuchsia, and last was violet ultramarine with a little blue added (all from BB!).

I poured the white in first. I poured it in lines lengthwise down the mold. Then, I did each of the CP colors and the MP pink came last. I repeated with the rest of the white, red, and MP, but I didn't use all of the pink or violet. I tried doing a quick swirl like the tutorial, but I think I just drug huge chunks of MP around (oops, I took too long). Then, I used the left over pink and violet to do widthwise lines along the mold. I used a skewer to swirl just that very top layer, which was really easy because the MP had cooled, making it impossible for the skewer to go through that :) I added little MP hearts I had made using white soap and red oxide. I put the whole thing in the fridge. Since it has MP soap in it, the high temps during the gel phase would probably not work in my favor!

Here are the finished bars. You can see that my hearts on the top didn't quite work out right. I should have figured out a way to get them to stand up or lined up with my cut lines. I have also decided that I should not have tried to drag a skewer through to swirl it, I'm pretty sure it would have looked better. My pink and violet are not as vibrant as they were, but that could be due to the fact that the soap didn't gel OR the fo contains vanilla and will be changing my colors over time. Overall, I'm happy though!

These are already up on the website, but they won't ship until February 6th.


Monday, January 28, 2013

Fifty Shades of Soap

In one of my recent orders, I received a fo called Fifty Shades as a free gift. I am not a fan of the book (different topic), but I swooned over this scent! It is masculine and sexy and amazing! I have a feeling the ladies will love this one too though.

You can tell my inspiration for the soap came from the name. I really considered creating an ombre soap, but decided that I liked the idea of something a lot less even. So, I ended up separating my soap into 8 containers with varying amounts of black oxide and randomly dumping different amounts in the mold. I didn't even bother with any other swirling! I'll admit that I was worried it would look bad, but I actually love them.

I think they look perfect and smell absolutely amazing.

These will be available February 17th.

Monday, January 14, 2013

New Soap; Needs a Name...

I purchased an essential oil blend called "Mother Earth." It is a blend of Bergamot, Cassia Root, Cedarwood, Nutmeg, Lavadin, Peppermint! It is so good. I can't even describe it; maybe a little earthy, minty, spicy? I had meant to make the soap with it a while back, but that didn't happen. 

I did get it done last weekend though!

I colored it with micas and oxides. My inspiration was the name of the eo blend! It is brown on the bottom (sort of, I should have mixed better), green in the middle and blue on top. I did a hanger swirl (check out how to do it here) to get my layers to mix a little. I really like the way it looks! I wasn't sure about the scent at first, but after curing for a few days, I love it. It is lightly scented because I didn't want to go overboard. It smells mostly minty, but the other scents come through nicely.

Can you think of any good names?

It will be available on the website around February 10th!

Monday, January 7, 2013

Rebatch! A Success...

As a soapmaker, I have always cringed at the thought of having to rebatch soap. HELLO! IT WAS SUPPOSED TO WORK THE FIRST TIME!!! But, it happens. Usually, I end up chopping it up and giving it away to friends and family because I just can't bring myself to sell something that did not turn out anything like my vision. Once, I made it into soap balls and sold some, gave others away to kids at the farmer's markets.

I have recently found out that rebatching your soap does not have to be all bad. I was reading about rebatching adventures over at Great Cakes Soapworks and I thought about my bowl of soap shreds and scraps and decided to give it a try.

Well, my first batch did not go well. I don't think I let it cook long enough or didn't add enough liquid. I might try rebatching the rebatch :)

My second try was much better! Here is my process...

First, add soaps shreds and small chunks to your crock pot. You can see, this is from lots of different batches. I added 8 oz of water for 2 lbs of soap because some of the shreds were of unknown origin.
 I let it cook a really long time on low heat. I kept going in to stir. Eventually, it looked really moist and mostly uniform. I added a few white balls and pink chunks to give it a little something extra. I put those in and let them sit in the hot soap for a while. I didn't want them to dissolve into my mix, but I wanted them to absorb a little moisture and be incorporated well.
 This is my soap in the mold. I used buttercream and snickerdoodle fo, which is why it is so brown. Because it was pretty liquid, this step was pretty easy. I used a big spoon to put it in the mold, I wanted to make sure I got it into the corners. Then, I tapped (slammed) my mold on the counter a few times (lots and lots) to really pack everything down.
 He is the soap out of the mold the next day. You can see it have some discoloring to do, but I think that will help some of the chunks to stand out more. I'm going to let them sit for a bit to let the water evaporate. I really don't think I over did it though because these are pretty firm already. Then I'll clean them up and go from there.
I know they aren't the prettiest soaps ever and really, I should probably keep my scraps separate, but I found a use of all the scrap soap we end up with, but never know what to do with it. Stay tuned, these will probably go up on the website soon. I'm kind of thinking about selling them to raise money for another turtle nest. What do you think?

I'll let you know how the rebatch of my rebatch goes.

Monday, July 9, 2012

Landscape Soap

I saw this idea on the soap challenge at Great Cakes Soapworks blog. I didn't have time to participate because of school and all those pesky things teachers do at the end of the year, but I saved the ideas for later. I loved the idea of a landscape soap and I really wanted to try one.

I decided to make my Twilight Seduction soap a landscape soap. I wanted it to look like twilight over water. So, I studied lots of pictures of twilight, which isn't easy because most of what came up on the first search involved Edward and Bella. Not helpful! But, I finally found some pictures that I loved.

I decided that for my first try, I would use fewer colors than are generally associated with sunsets. I wanted the moon high in the sky, but when I made the batch for my moon, I didn't think about the fact that the sun is still present. Oh well, I'll do that next time. My fragrance is a blend of vanilla and mint. I didn't want the vanilla to discolor the entire soap, so I only used vanilla half of the soap. So, here are the steps I took for my masterpiece.

1. Make soap. This step is critical.
2. Divide soap in half. Scent half that will make up the water with a vanilla blend, add shredded soap to look like reflections, and color with a mix of ultramarine blue, violet, and black oxide (more next time.) Pout into bottom of mold.

 
3. Scent other half of soap with mint eo blend. Divide this into three equalish portions in plastic cups. Color one yellow (use brighter yellow next time). Spoon carefully on top of water. I liked this because it didn't break the other layer and added texture.
 4. Color other portion pink/orange (brighter next time). Spoon over yellow.
 5. Add white thin soap log that you spent a lot of time trying to make into a nice circle. Next time, don't let the embed soap sit so long. It was hard to make round.
 6. Color the last bit of soap blue, violet, and black (darker next time, but not as dark as the water). Cover pink layer and that pesky moon. Don't smooth it out. It looks nice like that.
 7. Wrap up nicely for gel or not as you prefer. Clean up the mess you made.
 8. Pull out of mold and admire. Then cut.
 9. Don't fret about sad looking water layer. The vanilla will make it darker. A lot darker I hope.
 10. Celebrate the discoloring power of vanilla, for once:)
Notes for next time:
  1. Make the moon round, not oval.
  2. Make the water darker. 
  3. Add a setting sun.
  4. Make the colors brighter
  5. Make less of a mess
Have you ever made a landscape soap? If so, do you have any tips?

Thursday, June 21, 2012

BooBees Ambrosia Soap

Did you know that in Greek mythology, ambrosia was food or drink for the gods? It provided them with ageless immortality and had to ability to wash away the effects of the years. Many believe that ambrosia was supposed to be a type of honey and the association to ageless immortality is due to honey's ability to heal. Even today, honey is often used by many because of its ability to heal. Read more about the benefits of honey here.

All BooBees products are formulated with goat's milk and honey to give your the richest, creamiest bar of soap possible. Goat's milk, like other milk, contains lactic acid which helps dissolve dead skin cells. It also contains a good amount of cream which is full of fats that help your skin look healthier because it provides extra moisture. In soap, goat's milk creates a creamier, more moisturizing bar of soap. People with dry skin or certain skin conditions, such as eczema, may find that soap formulated with milk can help relieve these conditions and leave their skin nourished.
In the mold. Oh, the anticipation!

Honey adds to the humectant qualities of the glycerin already in the soap, but it also acts as an antimicrobial agent on your skin. It will help keep your skin clean and beautiful. Plus, the sugar in the honey will make the soap even more bubbly!

Out of the mold and cut!
BooBees Ambrosia soap is lightly scented with a warm, rich blend of oatmeal, milk, and honey. It smells amazing when you first take a whiff. Then, when you mix it with water and start sudsing up, you will find that it warms into an experience all its own. It will surround you with layers of bubbles, all bursting with the scent of true ambrosia.

To give them a little extra gorgeous factor and to remind you to feel your boobees regularly, I added a little pink on the top.

Sunday, February 26, 2012

Lullaby Soap

I finally decided what I wanted to do with the soap! I made the lotion and couldn't wait to make the matching soap, but I couldn't decide what to do! It finally hit me...I would make it pink and blue. I also decided to try a technique I've seen where the soap colors are perfectly separated.

Lullaby (formerly known as Hush-A-Bye) is a lavender/chamomile fragrance. It is more floral and powdery than real lavender and chamomile, but soft and gentle just like our babies. You will also notice hints of orange, musk, and cedarwood. It is probably one of my favorite fragrances. It is very similar to some of the big brands sleepy time lotions and washes.

Saturday, February 4, 2012

Tender Romance...


Valentine's Day is coming up and what you really want is something that you can enjoy together! Chocolates are great, but they only last so long :) Plus, they go straight to the hips!

Try our Tender Romance Gift Set instead!

Saturday, January 7, 2012

Valentine's Day Soap

I bought some of BB's Fired Up Fuchsia and I've been trying to figure out what soap to use it in and I decided on a Valentine's Day soap. I know that most of what we see is a pretty pink or red (see last year's soap), but I decided to do something a little differently this year.

I chose to use a scent blend with amber, musk, vanilla, and sandalwood. Plus, a vanilla color stabilizer because that has "discoloration" written all over it! For my colors, I used Fired Up Fuchsia, Rose Kaolin Clay, Brick Red Oxide, and some titanium dioxide.

I made my soap and only mixed to a light trace. Then, I poured a small amount of scented soap into three plastic cups for different colors. The main portion was colored with Fired Up Fuchsia (which looks really orange in the pictures, but is hot pink!).

I poured some of the main soap into my mold.

 I poured about half of my three other colors in a swirl pattern. Some of it sank, but I wanted it to reach the bottom, so I wasn't worried.

 Then, I poured the rest of my fuchsia soap. I poured my other three colors carefully, so they wouldn't sink this time.

 I used my handy-dandy bent hanger to swirl the soap up and down.
 Finally, I used a skewer to to gently swirl the top. I love the colors! The red oxide and titanium dioxide look great. The rose clay looks more brown than rose, but I really like it.
Want to see what it looks like all cut up? Stay tuned...

Friday, October 28, 2011

Dark Chocolate Pumpkin Soap

I had an idea for a Halloween soap, but I was running a little behind. Sure, I could make a hot process soap, but as my idea involved multiple colors and that we soapmakers generally assume you can't do pretty swirls in hot process. However, I found a soapmaker's blog and she specializes in multi-colored beautiful hot process soaps.

I decided to give it a try. I also decided to use pumpkin puree as part of my water to mix with the lye! I used one of my favorite soaping recipes and I mixed to light trace. Then, I separated it into two large stainless steels pots (picked up on the cheap at my local thrift store). I colored one orange and one black. *TIP* Use the stick blender to mix in the orange first, then use the same blender to mix the black in. It won't interfere with the color and you have less to clean up. I set my oven on 180, put the lids on, and put my soap in the oven.

Black and orange soap (it is about even, the picture is just off) 
It is a very big pot for so little soap, but it was $5!
Here is the orange soap ready to go in the oven, I didn't get the black soap, but you get the idea.

I used black oxide and Tangerine WOW from Bramble Berry to color my soap. I needed very little and they didn't fade or discolor.  I did have to add a bit more of the Tangerine WOW after cooking to get the orange I wanted, but that is a joy of hot process soap!

I let the soap cook and check on it every 25 minutes. After about an hour, both pots separated into and oily mess! After my initial panic, I simply mixed them both back together and continued to cook. They cooked about a 1 1/2 hours total before my tongue didn't get zapped when I tested it.

It is really important to let the soap cool for a few minutes after cooking before adding fragrances or essential oils, especially if they have low flash points. I scented the black portion with BB Rich, Dark Chocolate and the orange portion with BB Pumpkin Spice. I didn't scent the entire batch the same because the chocolate fo discolors.

Time for swirling...which I didn't get pictures of. It was my first time and I was too preoccupied with getting it right! I used a method similar to the tutorial I found. I folded my colors together and then swirled. I am happy with the outcome, but I know what I can do differently next time! Plus, this batch only had to sit a week before it was ready to go!

Dark Chocolate Pumpkin Soap-A Real Halloween Treat!
What is your favorite Halloween scent?
Interested in getting one of these wonderful bars for yourself? Check out my Etsy shop!

Sunday, August 7, 2011

Little Hearts

I enjoy reading many blogs and some of my favorite posts are about...SOAPMAKING! I know, you didn't see that coming at all. Several of the blogs that I follow how classes for specific soapmaking techniques. I hope that in the not-to-distant future I will be able to start attending some of these classes. I learn a lot from ready tutorials and have tried a lot of my own, but I think it would be great to actually get to go and mingle with other soapmakers, while actually making soap!

One of the classes I'd love to attend would be Bramble Berry's Soap Weekend Intensive. It is a whirlwind weekend of soapmaking. I get to read all of the posts and see all of the great pictures, but I want to actually go and participate. One of the pictures from the latest SWI in June really inspired me.

Can you guess which one? I know its tough, but I love the picture with the little gold and purple heart swirls (you can see the soap here). How perfect would that be for one of the new kids' scents I wanted to make!?! I couldn't find a tutorial on how to do (although I'm sure there is one), so I decided to wing it. After all, I can see the way it would be done.

So, here is what I did...I made some soap :)
  1. I separated out a very small portion of the unscented soap and colored it with rose clay and some pink mica and poured it in a squeeze bottle (like the ones for mustard and ketchup at picnics).
  2. I scented the rest of the soap and blended until a thicker trace. I wanted my colored soap to sit on top easily. The base is scented with a vanilla blend, so it should turn a nice dark brown to contrast the rose color.
  3. I poured the thick soap into the mold.
  4. I very carefully made lines of little soap dots with the colored soap down across the soap.
  5. I ran a skewer through the dots in in a swirl pattern. I considered just running straight down each line, but decided I wanted more swirled hearts. 
I'm happy with the overall look of the soap and I can't wait to cut it! I think it will be even prettier after it cures and the main soap darkens!

What do you think? Did I overdo the heart swirls or did I do pretty good for my first time?

Thursday, June 30, 2011

Milk & Honey Soap

I make a milk and honey soap that I just love. I leave it unscented, but I use rose clay to create pink swirls. Every time I do this it looks different. I've been playing with a lot of swirl techniques, but today I decided to do something simple. I did a modified "in the pot" swirl.

I separated out about 12 oz of soap and colored with the pink clay. Then I just poured some in 4 corners of my soap pot. I did NOT swirl it in the pot. Instead, I poured it in a swirl pattern! I don't know how it will look cut, but it looked cool when pouring.

I kept a small amount of pink soap and poured it in lines across the top of the poured soap. The I pulled a knife perpendicular across the rows of color. That's it!

As always, with milk or honey soaps, I soaped at a low temperature and I did NOT insulate my mold. The soap will gel without insulation, so don't cause yourself problems (like volcano soap) by insulating!
No insulation!
It is a little different than what I've done in the past, but that is what I love about swirling...it is still beautiful!


What are some of your favorite swirling techniques?

Wednesday, June 15, 2011

Redesigned Lavender Chamomile Soap

I've been unhappy with the look of my lavender chamomile soap, I'm just over the plain look with flowers blended in. I love the smell, but the flowers just look boring and old; so I decided to redesign it.

Instead of adding chamomile flowers to the soap, I made a tea with them and used that to mix my lye. The tea was pleasant smelling and had a lovely yellow color. When I added the sodium hydroxide it smelled like urine and looked like it too. Luckily, that disappeared and the soap turned a nice yellow shade, but the smell was lost (of course).

To give it a little something different, I infused some of my sunflower oil with alkanet root. The oil was a beautiful shade of burgundy. It is supposed to give cold-process soap a nice light purple color, but it can do all sorts of funny things.

I scented the soap with lavender essential oil and separated half out to be colored. When I added it to my soap, it turned a dark gray! I alternated pouring colored and uncolored soap right in the center of my mold and just let it run as it wanted. I gave it a quick circular swirl right in the center and covered it. Then I insulated and crossed my fingers that the color would change during gel.

This is what I pulled out of the mold! I love it! The main soap is a light yellow like chamomile tea and the rest is a light purplish-gray like lavender! I even like the pattern from pouring.


What do you think? Do you like my redesigned soap?

Sunday, April 10, 2011

Name It

I accidentally spilled the beans to my friend that the soap was for her birthday and she guessed the scent. So, I'm officially announcing that the scent of my funnel soap is Bramble Berry's karma synergistic eo. It is mostly patchouli, but also has citrus, floral, and ambergris. It smells so good! It is not just straight patchouli. It is pretty too!

Now it needs a name. I can't just leave it as karma soap. I want something fun that describes the scent and the fun tie-dyed look. Any ideas. Submit your ideas here or on Facebook. If your suggestion is chosen, you will win some of this fantastic soap (if you don't like patchouli, you can ask for something different).

Sunday, March 27, 2011

Funnel Soap

I finally got the chance to make soap again! I decided to make a funnel soap. It is so easy and exactly like it sounds. I took lots of pictures, but they seem to be lost.

I used a base of olive-coconut-palm-shea with beer as my liquid. I seperated my soap into 5 plastic cups and colored it blue, yellow, red, green, and purple (although it looks blue). Then I poured each color through the funnel into my mold. I poured half of each soap through the funnel twice. Then I used a skewer to lightly swirl in a starburst pattern from the center out.
I know I used a lot of colors but it goes with the scent. The green is hard to see because it isn't very dark. I did not cover or insulate because I didn't want it to gel. I'll unmold in a few days and let you know how it turned out.